
Our content editor Lewis has recently reached a bit of a milestone that a lot of us have (or maybe still are) working towards: he’s renting a recording studio space.
As he moves through the reality of moving his recording studio space into a room outside of his home, Lewis has attempted to diarise some of the steps required in a bid to help readers working towards the same thing!
Moving day came quickly, with one band’s mix revisions trickling into my inbox the morning of. Sorry guys, I’ll be an extra day or two! Just my luck on that Saturday morning, it was pouring rain, and as a studio move, I primarily (almost exclusively) had fragile electronics, wooden furniture and cloth covered panels to move into the recording studio that day. Great!
Read all the latest product & music industry news here.
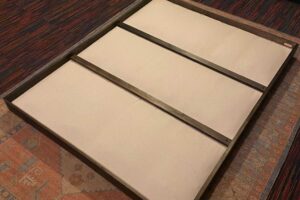 My ceiling cloud before hanging
The first job was to hang my ceiling cloud, an absorber and diffuser used to catch the first reflection from my monitors. Drilling hooks into plaster and wooden beams would make some mess, and if gravity had anything to do with it, I had better have a clear space beneath my sweet spot! Understanding how difficult it would be to hang the cloud perfectly straight with four hooks and an old, imperfect ceiling, I opted to hang it with a chain with a rated weight about ten times more than my cloud itself. You can’t be too careful! The other thing the chain gave me was the options to account for variations across the ceiling, as well as the different beams in the ceiling, the links allowing me to adjust the corners independently by about a centimetre at a time. With a little wrangling and quickly filling a couple of drill holes that missed the beams, I had four hooks in the ceiling and a ceiling cloud hung, as well as chains that accounted for parts of the ceiling and beams that weren’t perfectly straight. It was hard to tell how it sounded, but it looked great!
Planning a recording studio
I set to moving in other equipment, laying it out as I’d planned in a pre-organised Canva document. I’d slowly built looms for my home studio—big looms on sale are a great buy if you can solder! I’ve bought big 15m looms and cut them into three 5m looms and saved myself a lot of money, but all of these are pinned directly to my patchbay so I carefully unplugged just about everything and moved the patchbay first into the recording studio, laying out the cables both where the patch points would originate, at the patchbay, and the equipment they’d connect, making sure I had enough length. This kind of planning promotes a healthy workflow, while also preventing unnecessary furniture moving if you realise you’ve run out of cable!
Once laid out, and thankful my Canva plan was able to work with my patchbays, I moved in the heavier furniture, like the desk that would hold my console and the newly built and stained equipment rack. A couch at the back of the room serves as both a comfortable space for bands, as well as acoustic absorption. The back wall can serve as a huge hurdle acoustically, low end bouncing back and affecting the low end in your listening position.
 The studio couch!
Low end frequencies can bounce back at you out of phase, preventing you from clearly hearing what you need to in your sweet spot. While a couch isn’t a total solution, it definitely helps!
All the while placing furniture, I was keeping my acoustic treatment in mind, and leaving space for it. I had some additional panels I’d used at home; approx 3 inches of Earthwool wrapped tightly in canvas, built into a 1.2m x 1.5m wooden frame. To make them look a bit nicer, I planned to re-wrap an additional layer of canvas over them for a more polished look. Handy hint: drop sheets are both cheaper than material by the metre, as well as available in generally large sizes. The room already had black fabric covering all the walls, very, very roughly cut mind you, which felt both oppressively dark as well as a bit unfinished.
This inspired a purely aesthetic move: hanging curtains.
Dropsheets as curtains
The curtains were easy enough in theory, Bunnings has varying sizes of drop sheets available, intended to cover the floor of an entire room while painting, and they’re much cheaper than metres of more conventional fabric. The subdued colour of canvas also brightened up the room!
The walls are approx. 3m high and about 5m wide, so I bought a few 3.5m x 5m drop sheets to cut, sew and hang from a curtain rail that I’d fixed to the top of the walls. Ten metres of fabric either wall would allow them to bunch and ruffle nicely.
I’ll save you from making the same mistakes I did:
- Wash your drop sheets, canvas has a distinct smell and metres and metres of it can really add up.
- Measure and cut your drop sheets after washing them. They will shrink, in my case about 10cm, leaving the hours I’d spent cutting and sewing meticulously partly in vain, but my being too tired and in too deep to re-do it all. After all, I’d already trimmed and cut the curtains as well as sew them and hung them before I realised.
I used offcuts from the drop sheet, stapled to the carpet on the walls to bridge the gap between the curtains where the wall sconces held the lights in place. The fabric was also secured beneath the lights, and the gap prevented the canvas curtains from getting too hot near the lights.
 The curtains hung, with the bridging fabric around the lights still a work-in progress.
Following all this was a few rugs, a Facebook marketplace couch and my gear all racked and patched in. I was ready to work, so I plugged in my speakers, powered up a reference track and immediately noticed a painful lack of low end. Read more about measuring and correcting my room in the next chapter!
Keep reading for more tips making canvas curtains here.