How to work smarter not harder within your DAW.
Recording and mix sessions in DAW software (Digital Audio Workstation) can be daunting, with so many audio tracks, MIDI tracks, auxiliary tracks, sub groups, and the list goes on. With all of this in mind, it’s easy for our brain to end up like a bowl of spaghetti; all tangled up in routing and endless mouse scrolling.
DAW software
Thankfully, there’s a few simple things we can do to quickly tidy up our sessions to maximise efficiency and increase workflow. I’m going to focusing on the tools available in the latest version of AVID Pro Tools, but the principles are the same and can be implemented in what’s available in other DAW software.
Summary:
- Clear track labelling, colour coding and ordering is essential to being able to quickly navigate and make changes to your mix.
- Grouping tracks along with using auxiliary and VCAs can help you affect multiple tracks at once while maintaining control over their individual settings.
- Keeping your session clean and tidy will help you mix faster but also your collaborators as it enables them to see exactly what’s going on within your session.
Read all the latest features, columns and more here.
Layout, Labelling & Colour Coding
One of the easiest ways to keep a session in order is by establishing a consistent session layout, clear track labelling and for those who enjoy a little extra pizazz, colour coding.
In a typical band recording or mix session we’d expect to see an assortment of audio tracks usually consisting of drums, bass, guitars, piano/keys, percussion and vocals. Even in this relatively simple example, things can start to get hairy when trying to keep on top these different elements in a session window. Having a formulated layout of how tracks are displayed is so helpful, I would go so far as to say it’s calming; and makes for lightening fast navigation of a session.
For arguments sake and starting on the left of screen we’d typically start with drums and as we move to the right we’d have bass, then as we scroll further along we get to other elements such as guitars, piano/keys, percussion and vocals. Once an order has been established that works for your workflow, I’d recommend sticking with it. This will not only save your brain power for more important tasks but it will become second nature when navigating around even the densest of sessions.
Labelling is next and an important one. The key here is to keep it simple, easy to read at a glance and if using abbreviations, make them clear and obvious. For drums for example you might have a couple of mics on the kick drum. Instead of labelling them something vague like Kick 1 and Kick 2, something like Kick In (for the mic placed inside the drum) and Kick Out (for the mic placed outside the drum) would be a great place to start, and so on down the line. If more specific information is required, this can be placed in a comments section or similar.
Lastly, colour coding. Whilst it isn’t necessarily for everyone, colour coding can be great for quickly discerning elements at a glance. Most DAWs will give options to make colour coding glaringly obvious or more subtle. Having the audio clips or regions colour match that of the track colour is a great way to keep a mix session really easy to navigate, look at and is arguably less visually fatiguing. Much like the aforementioned layout and labelling examples, once you’ve decided on colours you like for your different instruments, stick with them. This will be especially helpful when pulling up sessions from years past, trust me.
ProTools
Auxiliary Tracks, Groups and VCAs
When it comes to building up recording or mix sessions organising different instruments and outputting them to auxiliary tracks (otherwise called busses or sub groups) is useful for numerous reasons. Without getting too technical, it allows us to route all the individual audio tracks of say a drum kit to a single stereo fader. This grants quick control of the whole drumkit by moving just one fader instead of multiple faders and it also allows us to add processing such as EQ and compression over the whole drum kit.
Auxiliary tracks are also a great way to setup and place an effect processor, where we can send multiple tracks to a specific effect at the same time. This thankfully saves us from placing delays and reverbs on individual tracks, which in turn saves a bucket loads of computer processing power. A win for both human and machine. This also loops back into the effectiveness of a session layout and keeping all your auxiliary effects tracks together is great practice.
Grouping is another powerful feature in DAWs for both recording and mixing as they allow us to control the way tracks can interact with each other.
Group parameters can get pretty deep, but typically they are incredibly useful for muting, soloing and controlling volume of multiple tracks simultaneously. When recording, allowing a group of mics for example to be record enabled at the same time cannot be understated. It might not sound that astronomical, but it means pressing record enable literally hundreds of times less in a session, that’s a lot of time saved! Another nice trick with groups is allowing the same processing to happen on multiple tracks which share the same insert processing. This is great for things such as overheads where you’ll typically have the same EQ and compression settings. But instead of having to copy things back and forth, the group does it all automatically.
VCAs (Voltage Controlled Amplifier) are a great addition to the world of DAW software. They have been around in analogue mixing consoles for decades, but in the digital recording world are supremely helpful. Put simply, VCAs are a volume control fader which is feed by an existing group of tracks; they don’t affect routing or have insert slot or send slots.
Whilst this may not sound very exciting, they are fantastic in the big picture of mixing. A particularly useful feature of VCAs in Pro Tools is the ability to adjust the volume of individual tracks that already have volume automation written to them. Normally you can’t adjust the fader positions of tracks that have volume automation written to them, rather they simply snap back to the position they were in before being adjusted.
However, if a group of tracks are feeding a VCA, we can adjust the VCA fader, which in turn will adjust the fader positions of those grouped tracks, whilst retaining all the the automation data relative to the new fader positions. This is particularly useful if volume adjustments are required towards the end of a mix or on a mix revision. Conversely, you can write automation for a group of tracks by just writing it to their corresponding VCA fader, pretty handy stuff.
Folders
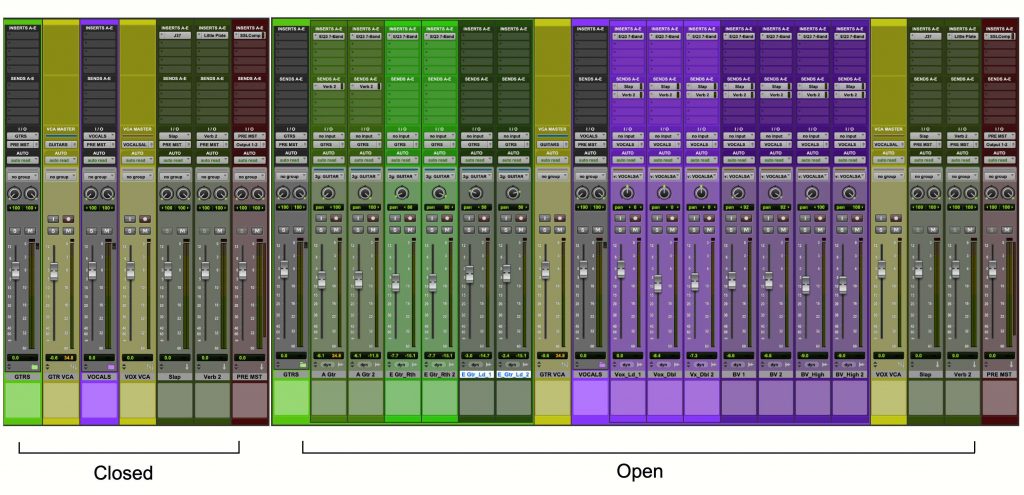
Something that’s been around for a long time in a lot of DAW software, but is relatively new to Pro Tools is folders. Anyone who’s dealing with 80-100+ track sessions or for those working in post production will particularly appreciate the blessings folders bring to a session.
Referring specifically to Pro Tools folders (you’ll need to check the specific parameters available in other DAWs), there are two types of folders available, basic and routing. Basic folders are great for cleaning up a busy session and storing tracks away nicely without affecting already established routing. They only have solo and mute buttons, are purely organisational and wonderful at doing just that.
Routing folders take things deeper and essentially act like an auxiliary track just with the added functionality of being a folder. They have insert and send slots, as well as input and output routing assignments. This is great for keeping multiple tracks all routed together through a mono or stereo fader, and can simply be opened or close when required, very tidy indeed. Employing the use of folders in any sized sessions is great for keeping a screen from getting too cluttered or from endless scrolling to find that lead guitar track. If you haven’t got into them already, I can’t recommend these highly enough.
Embrace the cleanliness
I for one, am incredibly thankful for the tools we have available today to help keep our recording and mix sessions clean and in check. There’s no hard or fast rules here, but exploring and finding an organised workflow that works for you will not only save you eons of time, but free up your mind to focus on the creative elements of recording mixing. Be gone the days of being told to tidy our rooms, embrace the time of well organised DAW software sessions.
For more, keep reading about Avid’s ProTools here.