Using Ableton's Sampler instrument to create a granular sampler
As musicians and producers, we’re always on the hunt for new sounds. These can be in the form of instruments or effects. Filter sweeps have become so ubiquitous, many won’t touch them. Flangers and phasers were invented decades ago, so, while still serviceable, the word “new”, hardly applies. Where to next, I hear you ask? Granular processing. A comparative new kid on the block, granular processing brings a host of new possibilities to the table.
For many, their first encounter with granular processing was by way of the native Ableton Live device, Grain Delay. Somewhat incredibly, Grain Delay was released with the original v1 application. This sleeper still sound fresh today and has inspired countless plugins from a myriad of developers: Arturia Fragments, Output Portal, and Sound Toys Crystallizer are some of the most extensive granular plugins that arrived more than a decade after the Grain Delay. There are a host of granular samplers and synths on the market too, but rather than getting the wallet out, in this tutorial we’ll look at ways to create a granular playback sampler using Live’s inbuilt Sampler instrument.
Read all the latest features, columns and more here.
Before we progress, let’s look at what granular processing actually is. In both the digital and analog worlds, sounds can be recorded and played back with incredibly high fidelity. Until relatively recently, this process saw the recorded sound played back in a linear fashion, from start to finish. With some ingenuity and a tape deck, samples/recordings could be reversed, pitch shifted, distorted, flanged, and more. Implementation was difficult, however, and many artefacts and side effects were generated at the same time. In the analog domain, slowing down or speeding up a recording, resulted in the lowering or raising of pitch. Additional artefacts were produced as the formants of the recording were also manipulated.
Composer Michael Nyman happened upon this by happy accident. When recording his masterful ambient piano piece, Decay Music, the tape played back at the wrong speed at some point in the production process. Not only did this lower the pitch of the piano, the timbre or tone of the instrument was also darkened.
The Beatles and Led Zeppelin famously experimented with this effect too. On ‘Strawberry Fields Forever’, John Lennon recorded the vocals with the tape sped up so that when it was slowed down, his voice had a decidedly sombre, alto texture. On ‘The Song Remains the Same’, Robert Plant went in the other direction, resulting in a brighter and more exultant sound.
So, what does this have to do with granular processing? For a long time, as discussed above, the stretching or shrinking of a sample produced a number of artefacts, both desirable and undesirable. As digital playback systems increased in power and complexity, samples could be easily manipulated in new ways. One of the key features and selling points for Ableton Live, from the first version, was the ability to stretch and shrink songs so that DJs could alter the tempo of a track without altering the pitch or the formants. A revolution is born!
Perhaps not well known, is the fact that this was achieved with granular processing. An algorithm was developed to capture short samples, or ‘grains’, of audio from the original source. These were randomly inserted and crossfaded in between samples of the original audio to extend the length of the original recording without noticeable artefacts and now features in every major DAW. As Ableton had already completed the leg work to develop this algorithm for time stretching, it wasn’t a great leap to repurpose the technology into a device to process audio. The Grain Delay was born.
Fast forward almost 20 years, and the version 11 release of Ableton Live brings with it a host of new granular processors for sampling and audio manipulation. Rather than drawing on these, in this tutorial, we’ll make our own granular sampler.
Granular Sampler
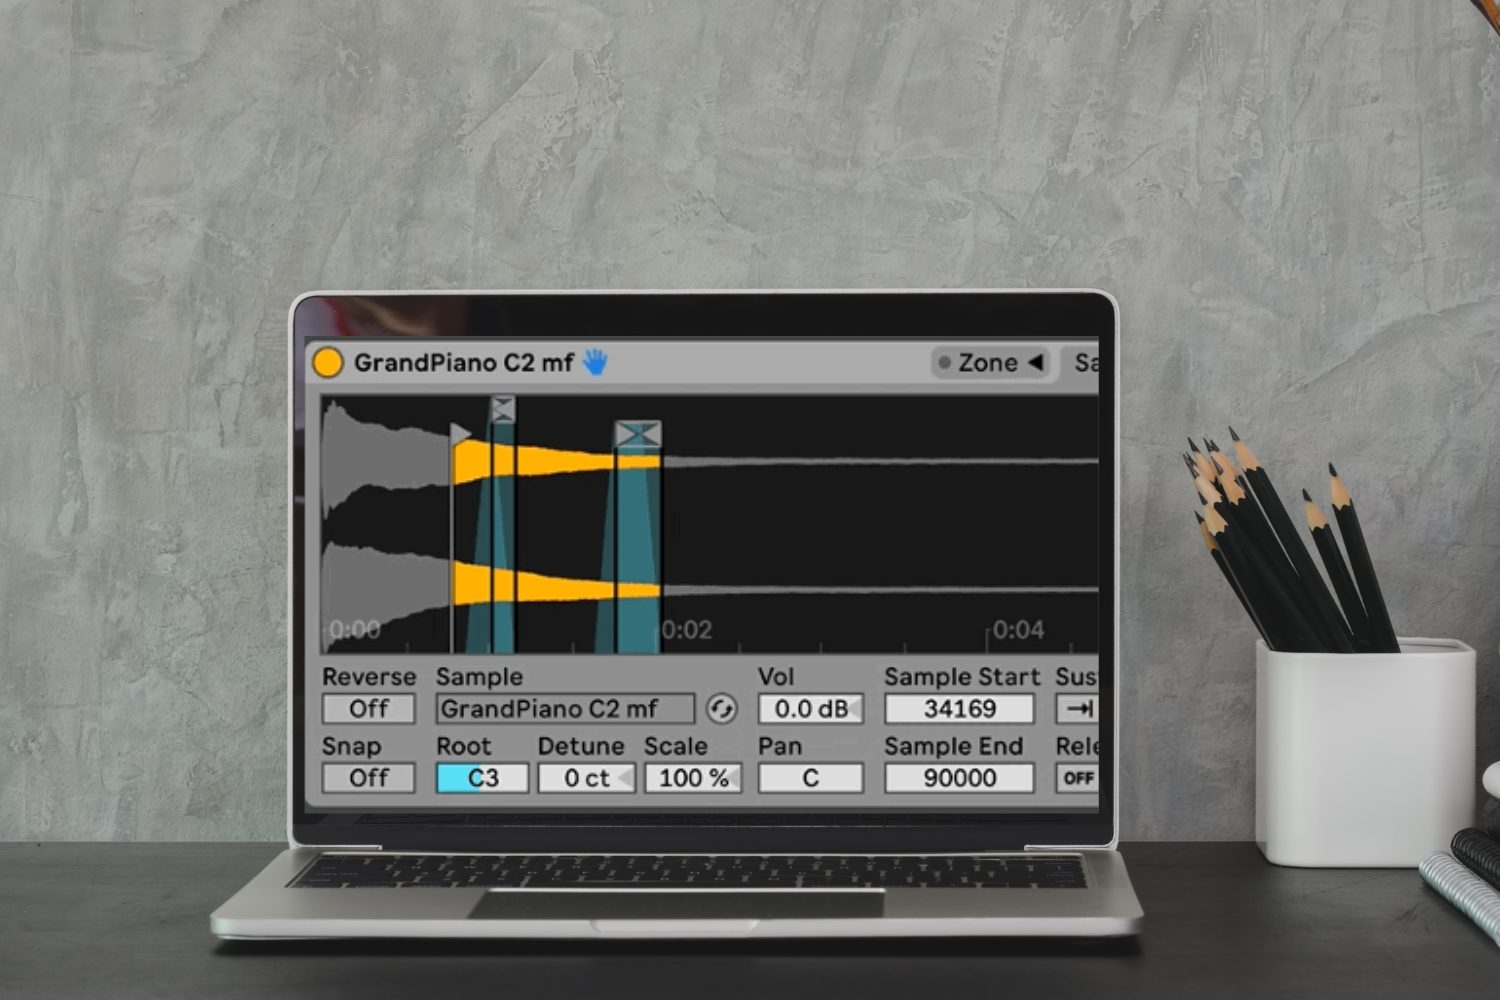
Using Ableton’s Sampler device to modulate a number of playback parameters we can create a granular sampler to create some beautiful sound design possibilities. First, find a sample. To best illustrate the technique, use a simple sound (once familiar with the technique, experiment with all kind of samples and prepare to be amazed and repulsed in equal measures!). Assuming you have the Grand Piano pack installed in Ableton Suite, type CMD/CTRL + F to bring up the browser and type “grandpiano c2”. A similar sample can be found here.
Drag one of the notes into the drop zone at the bottom of a MIDI track and it will automatically open into the Simpler device. From here, right click on the device header in Simpler and right to click to reveal the context menu. Select the “Simpler -> Sampler” option at the bottom of this menu. Now, copy the parameter settings that have been changed, inside the green boxes.
Sample Tab
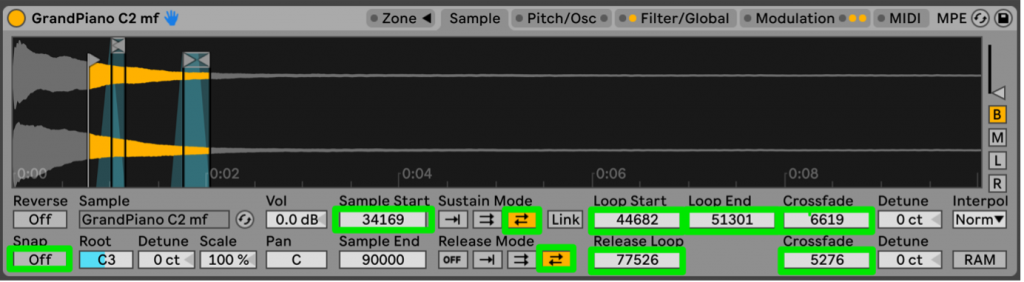
Some key considerations are as follows:
- Snap – Disabling Snap, allows the Sample Start, Loop Start, and Release Loop settings to be set at any point in the sample, rather than just a zero crossing. When enabled, this parameter, forces these parameters to the nearest zero amplitude sample to avoid clicks. In this instance, we want flexibility, so turn it off. (The click will be removed by adjusting the Attack envelope later).
- Sample Start – This sets the playback start position. It can be set anywhere, but by making it a little later, the delay between sample start and the looping grain segment is reduced.
- Sustain Mode – When a note is held, the sample plays back and forward between the Loop Start and Loop End values, configured next.
- Loop Start – Defines the looping region start after the sample passes through the Attack and Decay stages, to enter the Sustain phase.
- Loop End – Defines the end of the sustain, looping region. With these settings, the grain size is approximately 130ms. This parameter wildly effects the sound. When you set it the minimum possible value, expect some crazy sounds.
- Crossfade (sustain) – As the sustain portion of the sound cycles back and forward, the Crossfade parameter softens the transition as the sound cycles back and forth. Setting this to 0 creates some glitchy artefacts, so experiment.
- Release Mode – As a note is released, the sample plays back and forward from the Loop End to the Release Loop end.
- Release Loop – Defines the section of audio to be looped when the note is released. n.b If the Release parameter on the Filter/Global tab is set to zero, this will have no effect.
- Crossfade (release) – Again, this smooths out the glitchy artefacts.
Many of the parameters affect each other, so start with these to ensure it works. Once you have it working, tweak like crazy to explore more sonic possibilities. Remember, you can adjust parameters with the mouse, or click once, type the value, then hit enter.
Global Tab
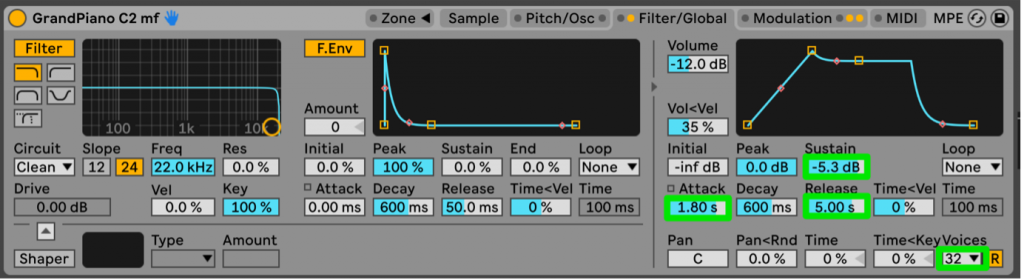
Not as many changes here, thankfully!
- Attack – This slows the onset of the sound and removes any clicks that may have been created during the previous step. Adjust to taste.
- Sustain – After the Attack the Decay have been played out, the Sustain is heard. This has been reduced a few dB to emphasize the Attack and Decay settings. A common approach in sound design to create the sound’s transient.
- Release – In combination with the Release Loop in the previous step, Release defines how long the sample takes to fade out when note is released.
- Voices – This defines the number of individual notes playable simultaneously.
Modulation Tab
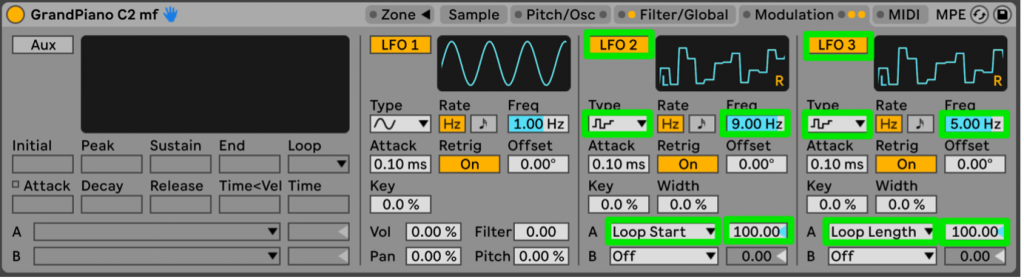
This is where the rubber hits the road. In this tab, we’ll use LFO 2 and LFO 3 to achieve the granular processing effect.
- LFO 2 and LFO 3 – These are set to modulate the Loop Start point and the Loop Length, respectively. The short grain of sound defined by the small looping time set in the sample tab, now scans back and forth randomly as a note is sustained. Enter the grain!
- Type – This is set to sample & hold/random. With this setting the Loop Start and Loop Length values will jump around randomly.
- Freq – Defines the rate at which LFO 2 modulates/changes the destination parameters set in the A and B modulation destination drop down boxes.
- “A” (modulation destination) – The modulation destination parameter. Here, it is set to Loop Start so LFO 2 will randomly modulate the start position for the looping, sustain portion of the sound. For LFO 3, it is modulating the Loop Length. The box to the right of these sets how much these parameters are modulated by LFO 2 and LFO 3. Positive values will shift the Loop Start and Loop Length parameters towards the end of the sample. Negative values will shift the Loop Start and the Loop End towards the start of the sample.
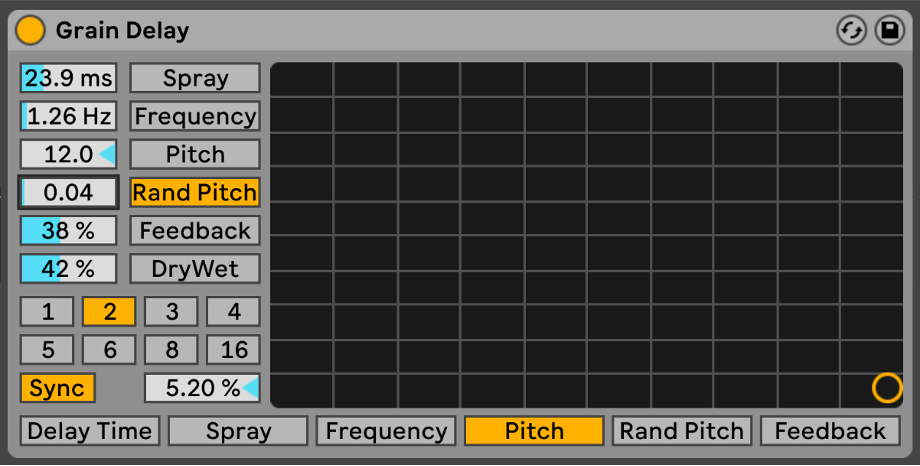
So now we have it! A granular sampler. Once you have it working, you can add some delay and reverb on it to create an epic soundscape that could fit nicely into a host of genres from synth wave to ambient. Better yet, why not have some grains with your grains, and add the OG, Grain Delay. This one is a wild beast and a warrants a tutorial in its own right. As a starting point, try the settings indicated below.
All things going well, you should have crafted your own granular sampler. Using a simple sample, such as the single piano note, can create beautiful, evocative pad sounds that keep us clear from the generic lure of the preset.
Below you can download a session file with the Grain Sampler nested into a macro controller rack for easier control. I added a cheeky FM macro or two for extra spice. Happy tweaking!