On November 14, Ableton announced the next iteration of their flagship DAW, Ableton Live 12.0. With the announcement comes a host of new functions and features.
Ableton Live – The Missing Shortcuts
Some of the most exciting additions to Ableton Live include a new synth with creative waveshapes and endless modulation: Meld. A distortion/destruction playground Device called Roar. Robert Henke’s legendary Max for Live Device, Granulator has been re-tooled to version 3. The user interface has been tweaked, thank the lord, and you can now view the mixer in the arrangement view.
Read up on all the latest features and columns here.
There’s a host of generative MIDI tools to clear artistic blocks and take out some of the grunt work in beat programming. The global key signature/mode tool will ensure you never colour outside the lines regardless of your music theory knowledge. Utility updates include content tagging in the browser and a powerful search engine to find and replace similar sounds. All in all it looks to be an incredible upgrade and Mixdown will have a full review for you to soak up all of the new in an upcoming issue.
Before that, let’s look backwards at upping your Live game with some shortcuts to take full advantage of Live’s flexibility, so that you’ll been in a better position to exploit the new features upon arrival in 2024.
First Steps
The overall design aesthetic within Ableton has always provided a clean and uncluttered workspace that minimises distractions and information overload. This can at first make Ableton Live appear to lack functionality in comparison to other DAWs. The list of shortcuts available is modest within Live so we’ll look at introducing a handful more without triggering information overload.
Within Live there is the ability to use the QWERTY keyboard for both shortcuts and also as a MIDI keyboard. The Computer MIDI keyboard, as it is known in Live, reserves many keys in for inputting notes, changing octaves and velocities. When engaged, the top row of the QWERTY keys are black notes on a piano keyboard, the middle row the white keys, the letters “z” and “x” shift the notes up and down octaves whilst “c” and “v” increase or decrease velocity. This is a great little tool but renders a good portion of the keyboard unusable for our new shortcuts. Thankfully, it can be toggled On/Off. First, click on the button in the top righthand corner of Live’s interface, indicated in Image 1 to ensure the keyboard is not in MIDI mode. While we’re on the topic of shortcuts, the “m” key will provide a mouseless method to achieve the same.

Image 1
Whilst there is no specific ability to edit keyboard shortcuts within Live, the Keyboard Mapping mode does allow you to create additional shortcuts and interaction opportunities using the humble QWERTY keys. Over time, I have developed a number of different techniques to aid with navigating around the interface using the keyboard. One of my favourites is the ablitily to instantly go to a track, and reveal all of the plugins with a single keystroke. This is especially useful for large sessions. First, you need to configure a few preferences. Type CMD/CTRL + , (comma) to bring up the preference pane and select the options as indicated in Image 2.

Image 2
Doing so allows multiple plugin windows to remain open concurrently, hides plugin windows when another track is selected, without having to close them individually, and opens all of the plugins visible when a track was last selected.
Track Navigation
Now, navigate to a track, lets say a Drum Rack but this will work with any MIDI or Audio Track that has at least one Device/Plugin installed. Click the Key Map Mode Switch in the upper right corner of the interface, as indicated in Image 3, to enter Key Mapping Mode. The shortcut for this is CMD/CTRL + k.
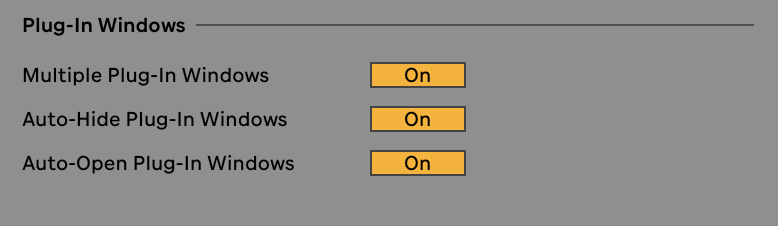
Image 3
A number of sections of the interface with now have an orange highlight. All of these can be mapped to a single keystroke. If you look at Image 4 you can see the orange highlights that indicate the various regions that can be mapped in this way.

Image 4
If you look closely in the top left of Image 5, you will notice the that name of the Drum Rack is also high lighted in orange. Left Click to select and type the letter “d”. (I like to use a lower case letters when using this technique so I don’t have to use Shift or Caps Lock to access shortcuts.)
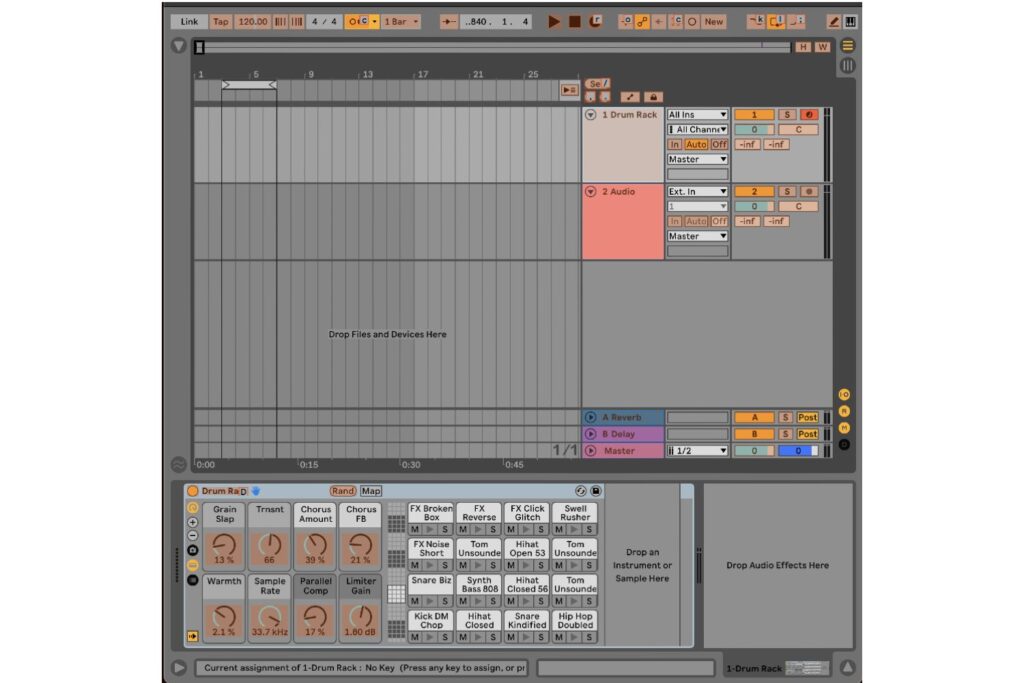
Image 5
Regardless of where which track you have selected, now, when you type the letter “d” you will return to the drum rack and all VST plugins you had displayed previously will be visible. Repeat this process with your Bass track but use the letter “b” instead. If you have a guitar track, or, group of guitars running through a single track for processing, use “g”. Pads? The letter “p”. Lead Vocal – “v”. Keys –“k”, Rode Electric Piano – “r” and so on. You get the picture. You can apply the same concept to your Aux Tracks – “a,b,c,d” etc.
Next victim, Master Track or 2 Bus. Here, I use the number “2”, as in 2 Bus, because the letter “m” is reserved for the Computer Midi Keyboard shortcut. By simply tapping the number “2” i can see all of metering and compression plugins in an instant. Noice!
Lastly, if I’m using a reference track I’ll turn off the Track Activator (track mute), keep the track playing in the background and use the letter “s” to have a quick listen!
Once you get the hang of it, moving around your Session quickly becomes second nature. Having already selected the Auto Hide Plugin Windows preference means you don’t have to click plugin windows to open and close them ever again.
Arrangement Locators
Whilst implementation of locator markers in Ableton Live is functional, it is far from comprehensive when compared to some DAWs. To improve this we can map a few keys to quickly insert and move between markers, using the same technique described above.
Use CMD/CTRL + k to enter keyboard mapping mode and assign the “,” (comma) key to the Previous Locator and “.” (fullstop) to the Next Locator buttons, and the “/“ key to the Set/Delete Locator button. You can now use these to quickly add locators as well as move left and right, along the Arrangment Timeline to the prevoius or next locator with the stroke of a key. At first these keys may seem difficult to remember but the “,” and “>” keys also provide the < and > arrows when used with Shift. Look at the arrows, rather than the punctuation marks. This helps you recall the functionality. (Refer Image 6.)
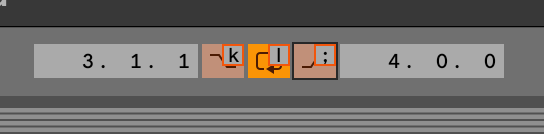
Image 6
Punch In, Punch Out & Loop
Three quick keys, for three vital functions. As indicated in Image 7, the letters “k”, “l” and “;” cover off these guys. The idea being, “l” is for Loop, and because the Punch In and Punch Out buttons sit ether side of the Loop On/Off, I use the keys adjacent to “l”. (Refer to Image 7). Be aware that you must already have an active loop selection for this to function. Simply click and drag in the Arrangement View and hit CMD/CTRL + L to make a loop selection. Now “l” will toggle the looping function off should you wish to hear what happens next in your arrangement and the punch in and punch outs can be toggled easily.
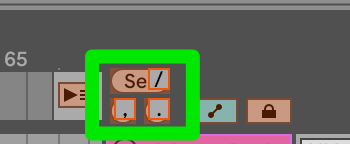
Image 7
Recording, MIDI Overdub & Capture MIDI
The record shortcut is mapped to F9 which doesn’t suit my workflow so I map it to the letter “r”. Much easier to access. MIDI Overdub lacks a shortcut so let’s map this to the letter “o” (not the number zero) Both are shown in Image 8.
I love the Capture Midi function. Should you be noodling around and stumble across something tasty, you can instantly capture the MIDI by clicking the button at the top of the screen. Better yet, assign the letter “c” and tap it. Your new idea is inserted into the MIDI track you have been playing through. As yet, this doesn’t capture audio in the same manner. Again, refer to Image 8.

Image 8
Metronome
This can be a live saver at times, and downright annoying at others. Assign this to the letter “t” for time, and finally it will dance to your tune. Hit the letter “t” to turn it on and once again to turn it off.
Final Words
Once you have mapped the “missing” shortcuts, head to the File Menu and select “Set Live Set as Default Set” and these will be available in all of your new projects.
Here is a list of your new shortcuts. Screen capture them and keep the .jpeg handy until you have them embedded into your RAM.
| KEYSTROKE | FUNCTION |
| d | Navigate to the drum track |
| b | Navigate to the bass track |
| g | Navigate to the guitar track |
| p | Navigate to the pads (etc) |
| / | Insert an Arrangement Locator |
| , | Move to the previous Arrangement Locator |
| . | Move to the next Arrangement Locator |
| k | Toggle Punch In status |
| l | Toggle Loop status |
| ; | Toggle Punch Out status |
| r | Record |
| o | Toggle MIDI overdub |
| c | Capture MIDI when not recording |
| t | Toggle Metronome |
These shortcuts should have you moving through your Ableton Live set like the ninja you were born to be, ready to get creative when Live 12 drops.
You can get Ableton 11 on sale right now!