Ableton Live 11 Sound Design Tutorial
Without looking to start a DAW war, Ableton has some unique functionality, simply not possible in other DAWs. (Flame me in the comments!) This tutorial leverages some of these features to create a unique routing and effects processing setup that makes it possible to add variations to short drum loops that sound like fills, without the need for more drum programming or loop splicing. The tutorial requires a basic understanding of the functionality of Ableton Live.
Summary:
- Ableton has some unique functionality, simply not possible in other DAWs.
- This tutorial leverages some of these features to create a unique routing and effects processing setup that makes it possible to add variations to short drum loops that sound like fills, without the need for more drum programming or loop splicing.
- This technique can work with any Ableton audio device or VST and you can build up a whole column of dummy clips to provide variation to any source when playing live or producing.
Read all the latest features, columns and more here.
First Steps
Grab a short drum loop and drag it into one of the clip slots in the Ableton session view. If you don’t have a loop at hand use CMD/CTRL + F to enter the browser and search box. Once there, you can enter the text “Blueprint Kit 01 88 bpm” and drag that clip into a MIDI clip slot in ‘Session View’. Click the launch triangle to start the clip playing.
Routing
Remember, Ableton only has two track types: Audio and MIDI. The Audio Tracks can also function as auxiliary busses and multiple channels can be routed to an audio track for group processing, automation, and printing stems. In this instance, however, we’re going to use Audio Track routing, for a technique known as “dummy clip” automation. The technique will allow control of effects using empty, or “dummy”, audio clips to fire automation commands.
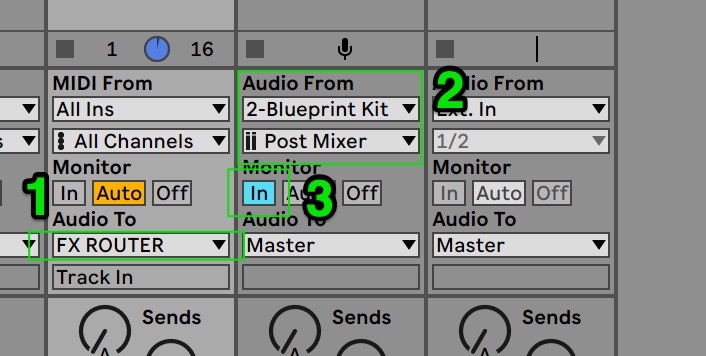
The channel with drum loop should now be named “Blueprint Kit”. Reveal the I/O section in Live that sits above the track sends. This can be done using CMD/CTRL + OPTION/ALT + I. Using CMD/CTRL + T, add a new audio track. Right click on the header of the track , select “Rename” and type in “FX Router”. Send the output of the track with the drum loop to the new track named, “FX Router” by changing the dropdown beneath “Audio To”, at the bottom of this section to read, “FX Router”. (Figure 1).
Look at the “Audio From” section of the new channel “FX Router” in the I/O section. In the “Audio From” dropdown select the channel with the drum loop. (Figure 2) Assuming you renamed the channel that is playing the loop, it should read “Blueprint Kit” Lastly, set the monitor section to “In” (Figure 3).
With the routing setup complete, starting playback should allow us to hear the audio playing back from the drum loop via the “FX Router” track, and the fun can begin.
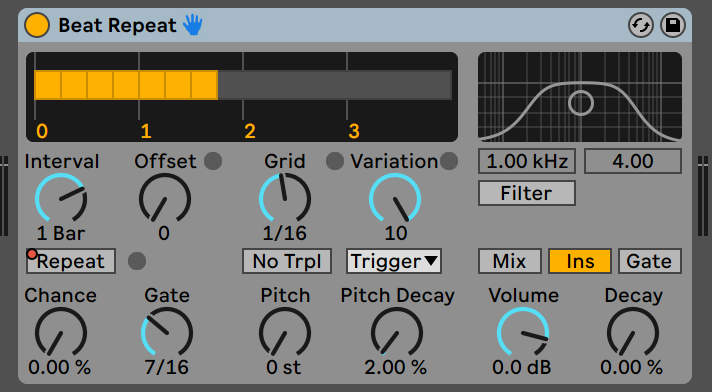
Again, using the search function, CMD/CTRL + F, type “Beat Repeat” and drag the Ableton audio device onto the FX Router track. Beat Repeat is a unique Ableton device that chops audio into quantised chunks, based on the settings of the various parameters, and plays back the chunks in time with the set you are working on. It is great for adding on the fly variations and fills to drum loops. (Going from the subtle to insane, Beat Repeat warrants a whole explainer in its own right!) For this example, just copy the following settings as a starting point but feel free to experiment once you have the basic setup working. Be sure to select insert mode, labelled “Ins” from the “Mix, Ins, Gate” buttons. This will put the Beat Repeat into “insert mode” and mute the original audio when the effect is active. (See image below). Experiment with the Grid parameter. Depending on the tempo 1/8 may work better than 1/16.
Dummy Clips
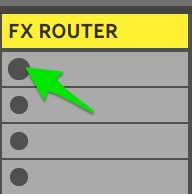
To create a dummy clip, record a 1 bar loop of audio into the first slot of the “FX Router” track by clicking the record enable button in session view, and hitting the record button in the corresponding clip slot. (As we have the monitor section set to “In”, the audio from the track will not be heard when the clip is launched).
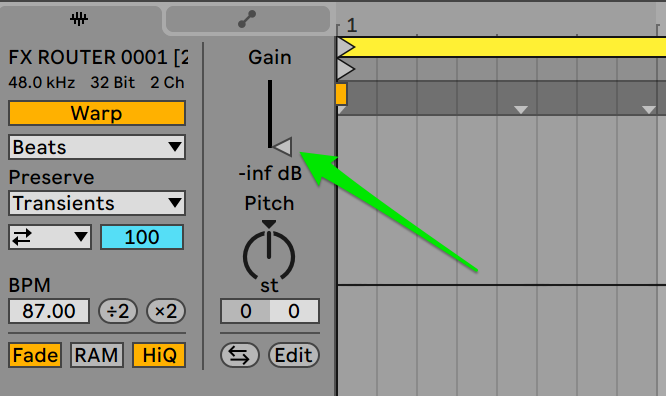
Once recorded, right click on the clip and rename it “B-Repeat”. Double click this clip to reveal it in “Clip View”. Drag the gain parameter down to “-inf dB” so that no audio waveform is shown.
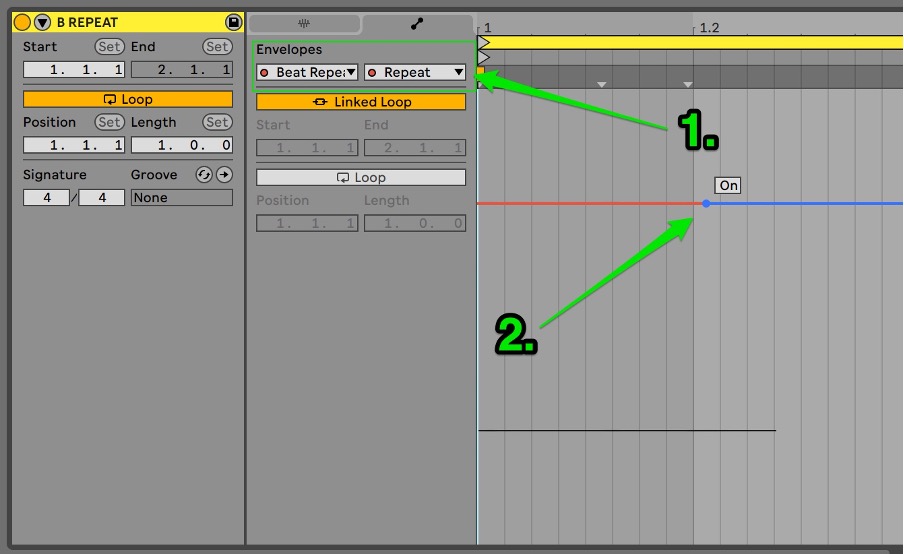
Now use SHIFT + TAB to switch from “Clip View” to “Device View”. Click on the “Repeat” parameter button and use SHIFT + TAB to jump back to Clip View. Assuming you are using Ableton 11, OPTION/ALT + 2 will reveal the Envelope Tab. (On 10 and below click the Show/Hide Envelope button at the bottom of the first Clip View column).
The top two dropdown boxes, directly under the Envelopes text, should read “Beat Repeat” and “Repeat” (Figure 1). The Sample Editor to the right should show a single, unbroken red automation envelope. Double click the line and drag the automation breakpoint to the top of the Envelope Editor (Figure 2). When you click launch on the clip labelled “B Repeat”, the Beat Repeat jumps into action. Nice!!
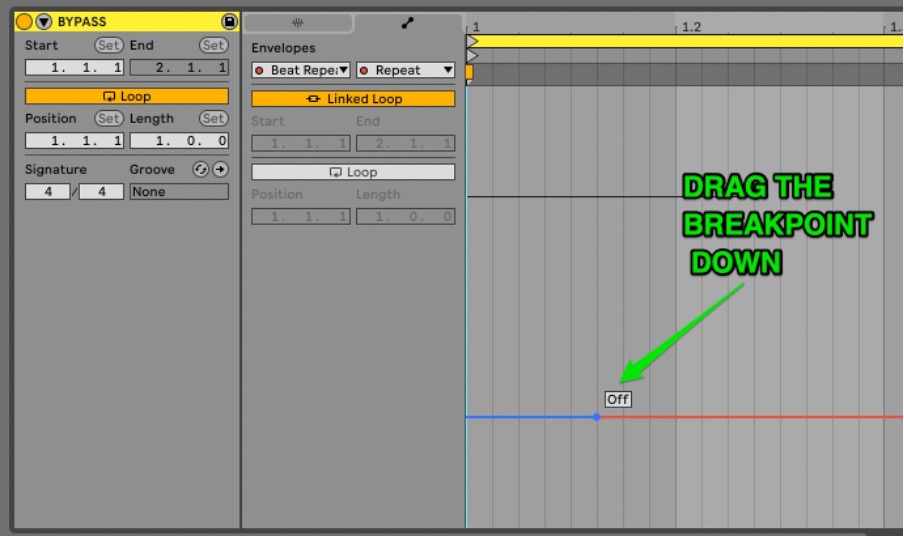
To complete the technique, a bypass clip is required. Click on the clip labelled “B Repeat” to select it, then use CMD/CTRL + D to duplicate it. Rename the duplicated clip to “Bypass” and select the “Repeat” parameter again, by clicking it once in “Device View” and jump back to “Clip View” using SHIFT + TAB. In the envelopes section, if it’s not visible, use the technique described above, grab the break point and drag it down all the way to turn the “Repeat” parameter off.
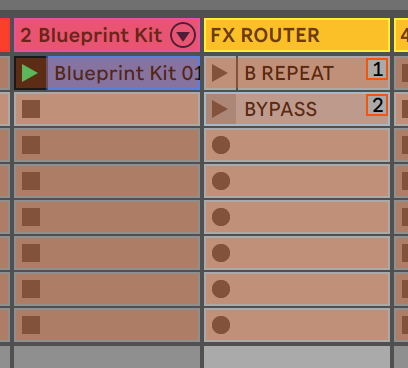
“B Repeat” and “Bypass” clips will turn the Beat Repeat on and off by clicking the two clips. If you want to take it one step further, you can assign the clips to a keyboard command using CMD/CTRL + K. Try assigning the clips to the numbers “1” and “2” on the computer keyboard. You can now launch the clips using the keyboard! And yes, it is also possible to map them to a MIDI keyboard or controller.
This technique can work with any Ableton audio device or VST and you can build up a whole column of dummy clips to provide variation to any source when playing live or producing. Filter sweeps, fade outs, and reverb washes can all be triggered using dummy clips, and multiple parameters and devices can be triggered from a single clip.
Greg Long is an audio educator at RMIT University and is one of Australia’s leading Ableton experts. To download Ableton head to their website.