Using samplers to increase the realism of drum hits in any DAW you work in
Technology changes over time. A startling realisation, I know! Sampling, for one, has undergone immense changes since the early 1900s jazz players in New Orleans who first “borrowed” licks and riffs from each other, as an homage, or in some cases, inside jokes.
Summary:
- Sampling started out as borrowed licks and riffs from jazz musicians in 1900s New Orleans, which then manifested into hardware units like the Chamberlin.
- Digital samplers eventually hit the market and now we have a plethora of software options.
- In this tutorial I’m going to look at ways to increase the realism of drum hits.
Read all the latest features, columns and more here.
As time passed, we started to see sampling manifest in hardware units. One of the first was released in the 1940s from Wisconsin, in the US. The eponymously titled ‘Chamberlin’ was a mechanical sampling keyboard invented by Harry Chamberlin. The sounds are just incredible. Some sources say Chamberlin recorded the instruments in a home studio with a Neumann U47 microphone. He was ahead of his time in more ways than one! This video gives a nice history of the Chamberlin and the genius Harry Chamberlin.
The Chamberlin range was expanded to include some sampling drum instruments called the Chamberlin Rythmate. The various Chamberlin instruments were met with positive reviews and proved to be modestly successful at the time. However, one of Chamberlin’s salesmen, Bill Franson, took two Chamberlins to the UK, without Chamberlin’s knowledge or permission. There, he rebadged them and sold them as the “Franson”. Still in the UK, Bill had the Chamberlins reverse-engineered and a new instrument, heavily indebted to the original, was born: the Mellotron. Hear this beast in all of its glory below.
Fast forward a few decades and the first digital samplers hit the market. Eye-wateringly expensive at first, these units were picked up by enthusiasts and a new market was born. Fairlight, Akai, Emu, and others all brought sampling to, “we the people”, and while the storage sizes were tiny, creativity overcame, and the art of sampling was born.
Now we see a wealth of samplers available in software form. These vary from huge sample libraries for orchestras, Spitfire, Native Instruments et al, to one-shot manglers like the new CR8 from Waves. In this tutorial I’m going to look at ways to increase the realism of drum hits, using velocity to modulate (change) the pitch of a sample and the cut-off frequency of a Low Pass Filter (LPF).
When using single drum hits, one of the most problematic issue tends to be a phenomenon knows as the “machine gun” sound. Put simply, when programming fast 16th or fills, the drums trigger the exact same sample every time. This results in an unpleasant “machine gun-like” effect being heard.
Before we look at the software, let’s first think about how a real drum behaves when it is struck by a stick or beater. When the drum is hit, and depending on the force of the hit, the drum skin behaves in different ways. The harder the hit, the start of the note, or attack, becomes more pronounced with more treble content. Additionally, the harder the drum is hit, the lower in pitch the drum will sound because a harder hit stretches the drum head more, making it effectively larger, so it vibrates at a lower fundamental frequency. Lastly, the harder the drum is hit, the louder the sound produced.
Armed with this information we can approach drum sound design with a little more knowledge to create more realistic and interesting drum sounds. To do this, we will modulate pitch, LPF cut-off, and volume with a combination of incoming MIDI velocities and a Low Frequency Oscillator (LFO).
For the images in this sampler tutorial, I have opted to use Ableton Live’s sampler instrument, somewhat confusingly titled, ‘Sampler’. (If you are using Ableton Live Suite and have the sample installed into the stripped back Simpler, right click on the header and click the Simpler->Sampler option to make the change).
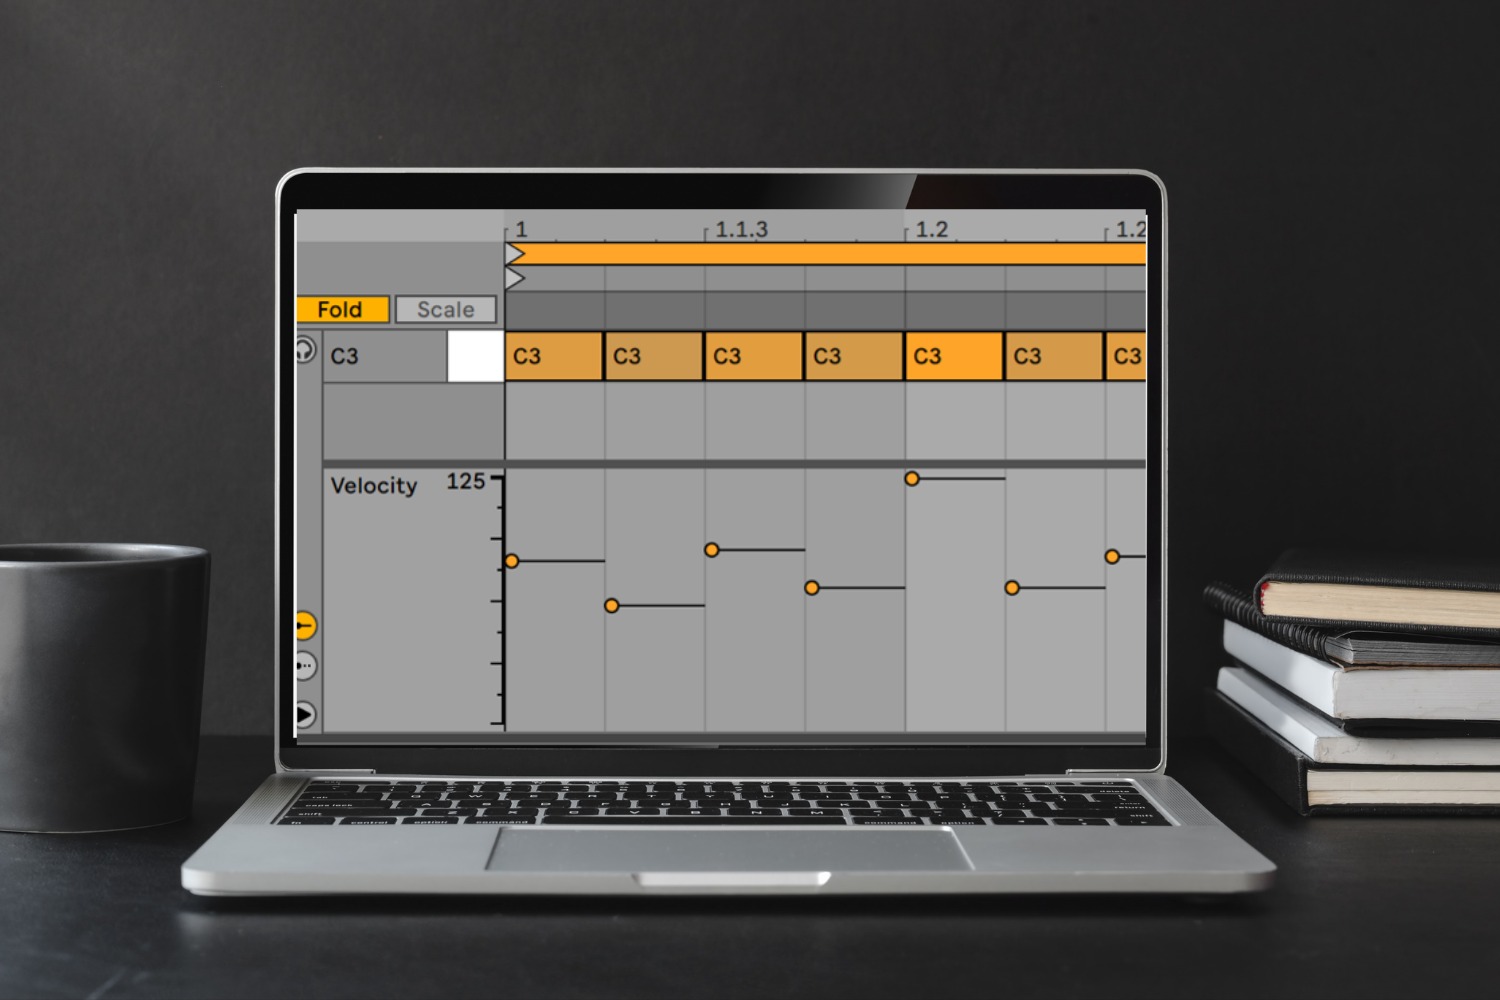
Whichever sampler you choose, start by grabbing a single snare sample and load it into the soft sampler. Next, programme one 4/4 bar of sixteenth notes into your DAW and click play. We hear a machine gun like drum roll. Far from pleasing, we have our work cut out. Let’s first edit the velocity of the drum hits and copy the velocity settings, in the image below. Note the heavily accented notes on beats two and four.
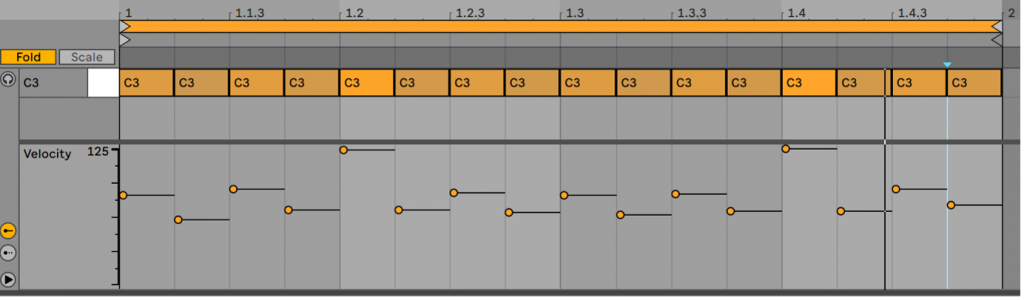
With this one move alone, we have created some interest with a definite pulse on the two, four backbeats. If you don’t hear any difference, you need to locate the velocity to volume settings in your sampler and make sure they set above the minimum value, as indicated in the image below.
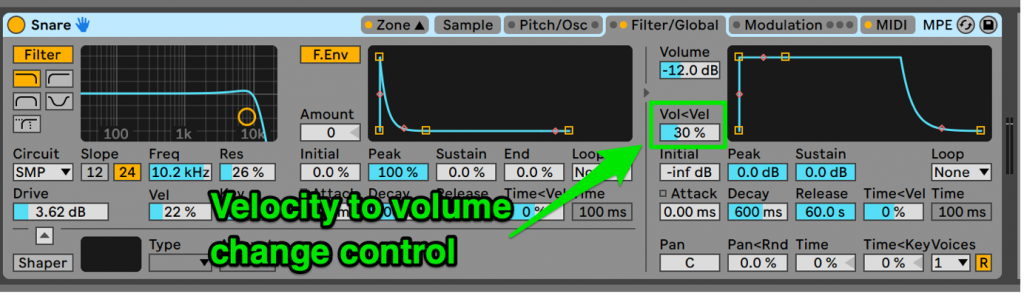
This has a provided a little modulation, but to the volume of the sample only. To make the sample more realistic, and listenable, we’ll dive deeper and start playing with the filter settings.
Now, engage the filter and select Low Pass Filter (LPF). Now, set the cut-off for the LPF to 10kHz. (If there is a parameter to adjust the Slope or roll-off rate, often expressed in dB per octave, select the 12dB option to provide a musical-sounding high frequency roll-off). This lets all frequencies lower than the cut-off frequencies through and filters all frequencies above the cut-off frequency.
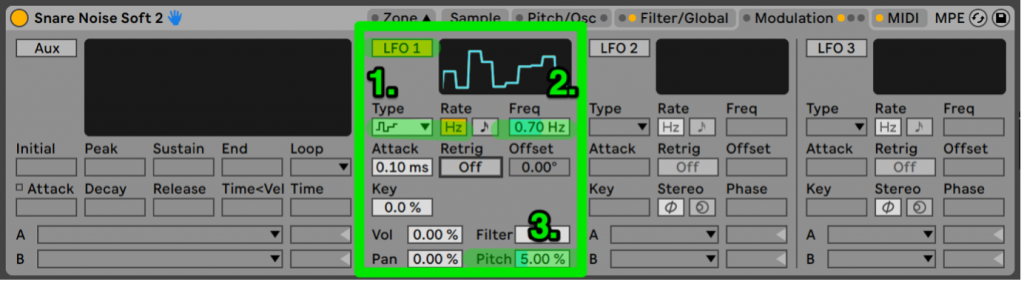
Highlighted in green, this next image shows all of the parameters that have been changed so far, including a few not yet mentioned. From left to right, top to bottom, here’s a brief summary of the changes.
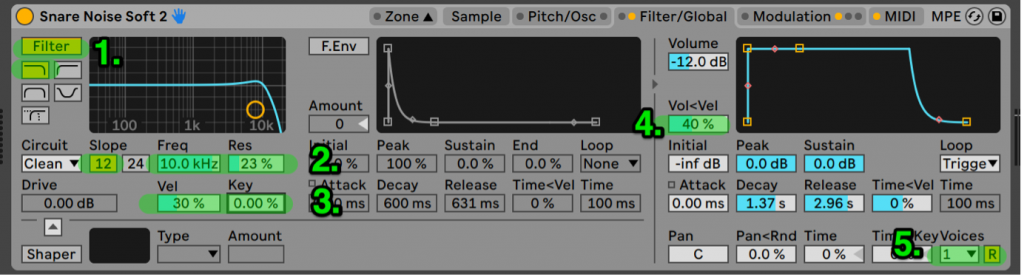
- Filter – Button is set to on to engage the filter.
LPF (graphic) – The icon shows a LPF, or low pass filter, has been selected. - Slope – Set to a value of 12, this indicates a filter with 12dB per octave roll-off has been selected. Nice and smooth for our purposes.
Freq – The cut-off frequency for the LPF (or any of the filter modes selected) – play with this value. Higher values make the sound brighter. Lower values make the sound duller. This value will be modulated by the velocity of the incoming MIDI note. Pay attention to the sound as the modulation may make the drum hit sound squelchy when the LPF cut-off is changed rapidly by the Velocity to Frequency in 3. Vel, below.
Res – Indicates the resonance of the LPF. Values above 0% increase the amplitude of frequencies at the cut-off point. Too much makes the filter “ring”. Too little may make the filter modulation difficult to hear. - Vel – This is the Velocity to Frequency modulation parameter. The higher the velocity value, the more the incoming MIDI note affects the frequency cut-off. Higher velocities will push the LPF frequency higher. Lower velocities will bring the LPF value lower. As we know, when a stick hits a drum skin harder, more treble is created so these settings will emulate this phenomena.
- Vol<Vel – The greater the incoming velocity, the greater the volume increases as the sample is triggered.
- Voices – I like to set this to one for drums with the next parameter set to re-trigger mode to mimic the fact that drum can really only be hit once at a time.
R (Re-trigger) – This parameter allows a new drum hit to be played without cutting off any hit that may be currently playing. This helps reduce machine gun effects.
The next tweak we’ll look at it is pitch modulation. When a drummer strikes a drum, no two hits will be heard at the same pitch. To emulate this, we’ll use a random LFO to constantly modulate the pitch of the hit. This will not override the Velocity to Pitch modulation that we set up earlier, rather, it will add to the pitch changes and realism of the hit. To achieve this, we do the following:
- LFO – Within your sampler, turn on a Low Frequency Oscillator that can modulate/change another parameter. Set the LFO to Random or Noise, depending on which is available (both produce random fluctuations to the sweep rate of the LFO).
- Freq – This controls how fast, the “frequency”, of the LFO moves. A setting between 0.5 and 0.75 Hz works well. This means most hits will be slightly different in pitch without introducing a wandering sea-sick vibe to our drum.
- Pitch – This parameter controls how much the LFO controls the sample. Experiment, but if you are going for realistic, less is more. If you are going for creative percussion sounds, try increasing this parameter using a tom or white noise sample.
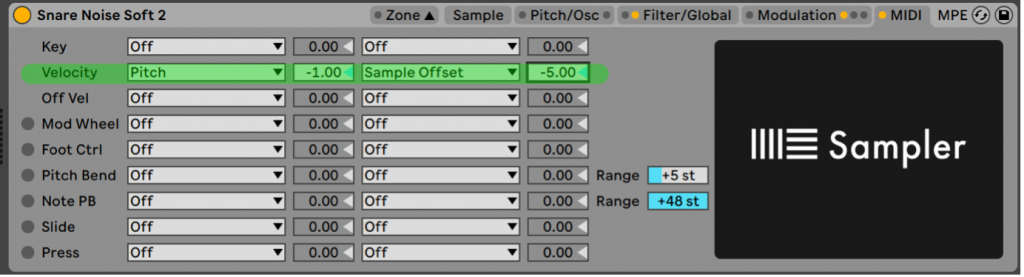
The last tweaks will affect both the pitch and the start point of the sample. This MIDI tab in the Ableton Sampler lists various incoming MIDI parameters and allows them to be mapped to another parameter, selected from a list. In the image below, we can see incoming Velocity has been mapped to pitch with a value of -1.00. The pitch of the drum will now be modulated by the incoming MIDI velocity. When a Velocity of 127 is received, with a negative value assigned, pitch of the drum will be lowered by one semitone. Lighter hits, with less velocity will lower the pitch to a lesser extent. As always, experiment and decide if the effect should be mild or crazy.
The Sample Offset parameter affects the starting point of the sample. With this parameter set to a negative value, a high velocity note will trigger sample playback from the very start of the sample. Lower values will start the playback slightly later, effectively softening the attack of the drum so it is less impactful to correspond with a gentler hit.
These techniques can be applied together, or, unique combinations, to make sterile “we are the robots” drum parts come to life. Even if you aren’t looking to make a “realistic” drum sound, these techniques work well with synth drum samples as well and can help breathe life into your sounds.
In most samplers, you can save a preset with all of the tweaks completed so next time, all you have to do is drop in the sample and start making beats!
To download Ableton head to their website.