Using Ableton's Analog Instrument device, MIDI Arpeggiator, and Auto-Filter devices to design an accurate replica
From out of nowhere, Stranger Things burst onto our screens in 2016. Inspired by classic ’80s cinema like the Goonies, Stand By Me, and Close Encounters of the Third Kind, the series resonated with a broad audience. The older, keen to relive the nostalgia of their youth and the younger, thirsty for the eternal kitsch, innocence of a decade they know only through pop culture. The mood of the series is very much indebted to the incredible synth wave soundtrack by Kyle Dixon and Michael Stein.
Read all the latest features, columns and more here.
In this tutorial, we’ll look at recreating the Stranger Things intro theme, the iconic arpeggiated bassline, which was created using the Roland SH-2. First released in 1979, the SH-2 is a monophonic synth that features two VCOs (voltage controlled oscillators) and a sub oscillator, effectively providing users with three oscillators to craft earth-shaking basslines. This design philosophy is very much present in Ableton’s criminally underrated, Analog Instrument device. Together with Analog, Ableton’s MIDI Arpeggiator, and Auto-Filter devices, we can design a very playable and accurate replica of the original.
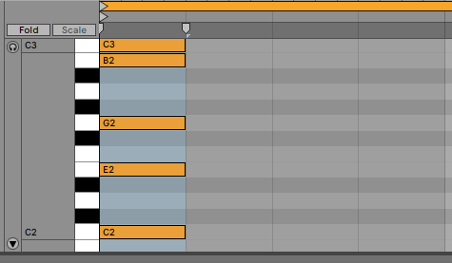
In a new project, set the project tempo to 84 bpm and use CMD/CTRL + F to enter the search field in Ableton’s browser and type “analog”. From the results, double click the Analog Instrument to add it to a new track. Clear the search field and add the Arpeggiator and Auto-Filter devices, using the same process. Double click one of the Clip Slots of the track where the Analog device is installed to add a blank MIDI Clip. Add the notes shown below to create the C major 7 chord for the bassline. Don’t worry about changing the note length in the clip, rather, we’ll use the Arpeggiator device to do this.
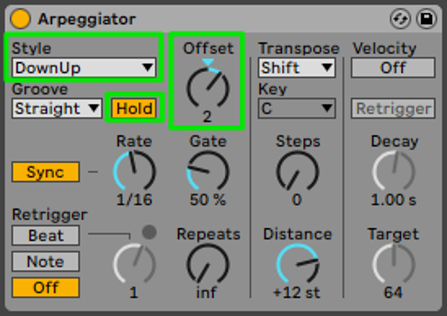
Using the Arpeggiator device, we will turn the chord into a running bassline by changing the Style to DownUp clicking the Hold parameter, to sustain the notes, and setting the Offset to 2. The Offset parameter starts the bassline on a G, rather than a C, which yields notes identical to those in the original theme.
When you click Play, you should hear the melodic bassline from the intro. The default preset for Ableton’s Analog Instrument is more than a little underwhelming in terms of sonics, so we’ve got some work to do.
The twin oscillators of the Roland SH-2, and all analog-controlled oscillators for that matter, use an analog clock to create the pitch of the oscillators. This clock is never truly stable, so the analog oscillators are prone to subtle pitch variations. This creates an analog synth’s warm, rich chorusing, that we know and love. By contrast, Ableton’s Analog Instrument device uses a digital algorithm to generate perfectly in-tune oscillators, sounding sterile in comparison. To emulate this, we’ll use the LFOs in the Analog Instrument to add random pitch variations to the Analog Instrument’s oscillators.
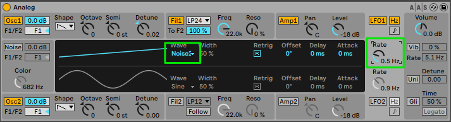
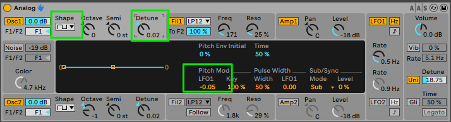
In the Analog instrument, click the LFO1 button to turn on the LFO and adjust the rate to 0.5Hz. Select Noise2 from the Wave(form) drop down. This waveform will create continuous random values, rather than the stepped random values produced by Noise1.
Now click on the mid-grey area surrounding the Osc1 parameters. This selects the Shell that displays the parameters associated with Osc1. Ensure Osc1 is set to square wave and gently detune the oscillator by 0.02 cents. This will provide some static pitch shift, to emulate the imprecise tuning of analog VCOs. For added realism, we will add continuous pitch variations using LFO1 to modulate the pitch of Osc1. In the Osc1 shell, set the LFO Pitch Mod to -0.02. Experiment with this parameter carefully, as it goes from the sublime to the ridiculous quite quickly. If you listen to the original version, you can hear that the VCOs are detuned quite dramatically. This chorus effect is a huge part of the ’80s sound so play around to find a setting you are happy with.
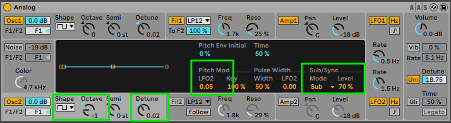
The settings for Osc2 are similar with a few important changes. Again, turn on LFO2, set the rate to 1.5Hz and select the Noise2 Waveform. For Osc2, we still want the square wave shape but this time, down an octave to thicken the sound. Click the mid-grey Shell around Osc2, to display the corresponding parameters. Set the Octave parameter to -1 and the static Detune parameter to -0.02. We’ll modulate the pitch of Osc2 with LFO2. Depending on your appetite for detuned destruction, set the Pitch Mod LFO2 parameter to 0.05, or thereabouts.
The Roland SH-2 possessed a third oscillator, that could be tuned one or two octaves down. This same functionality, restricted to one octave down, exists in the Analog Instrument. Slightly to the right of Pitch Mod Section, lie the controls for this third sub-oscillator, expressed as a percentage of overall level. Play with this until you find the right balance. This lower octave should be at a level to provide depth without taking over the tone. For me, 70 per cent is a nice balance.
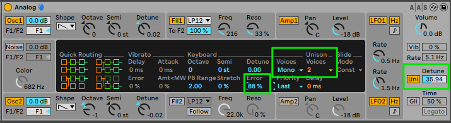
The sound should be closer to the original now but we’re not there yet. Click the mid-grey Shell beside the Volume parameter to select the Global Shell. A few changes here. Set the Voices to Mono(phonic) so only one note is heard at time, the way the Lord of the Bass intended. The Error parameter introduces random pitch variations to each note to further our analog emulation journey. As this sound is monophonic, multiple notes cannot be heard simultaneously, so this parameter can be set quite high, at 88 per cent, before it gets too wonky. The Unison Voices are set to 2 and the Uni switch turned on. Once turned on, the Detune parameter sets how much these 2 voices are detuned. Death by chorus, I know!
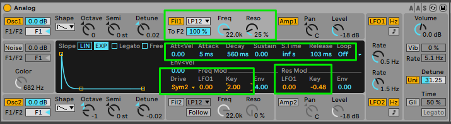
To refine the envelope, we’ll use the ADSR settings found in the AMP1 Shell. Click the mid-grey area near the Amp1 switch to select the shell. Soften the attack a little with a setting of 11 ms and turn the Sustain portion of the sound all the way down, to yield the characteristic “pluck” of the bassline. Copy the Release and Decay parameters and we’ll move on to the final tuning of the filter.
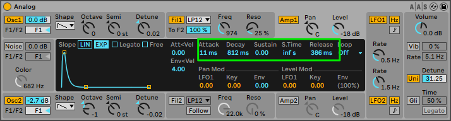
Select the Shell for Fil1 by clicking the adjacent mid-grey area. The filter is an essential part in this sound and is modulated manually throughout the track, an effect we can easily achieve with a mouse or MIDI controller. Set the filter to LP12, for a smoother low pass filter, and drive it a little by increasing the resonance of the filter setting the Reso to 25 per cent. Duplicate the ADSR settings for the filter, making sure the Sustain setting is down to 0.00. For the Decay value, experiment between 500ms and 1500ms.
Two of my favourite filter parameters are nested in this Shell. In the Frequency Modulation section, the Key parameter modulates the filter up and down according to the pitch of the incoming MIDI note. Assuming the parameter has a positive value, it will increase the frequency of the filter as the MIDI notes increase in pitch. The lower the pitch of the MIDI note, the lower the frequency of the filter. The last parameter is an interesting one. In the Resonance Modulation section, the Key parameter adjusts the resonance of the filter, depending on the pitch of the incoming MIDI note. In this instance, I set it to a negative value of -0.48 to increase the resonance of the filter as the pitch of the MIDI note decreases. Reduce it more to hear the low notes start to squelch! To me, this helps the sound remain audible when the Fil1 Freq parameter is set to low values, by creating some non-linear saturation within the filter, in conjunction with the Drive parameter, set here to Sym2.
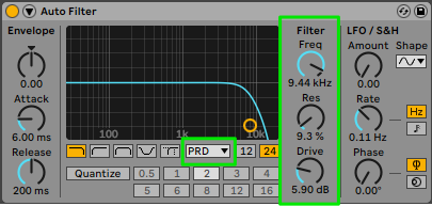
Lastly, we’ll use the Auto Filter Device to shave off a little of the highest frequency content, which can be an undesirable artefact of digital synthesis algorithms, to make the sound a little warmer, or, more analog. Select the PRD filter type from the drop down list, roll off a little high end, by reducing the Freq parameter down to 9.5kHz, increase the Res a little to 9.3 per cent and add some saturation with the Drive parameter. These are very much “season to taste” settings to feel free to play around until you find something you like.
Hopefully you now have a good reproduction of the sound and the bassline. To complete the task, manually sweep Freq setting in the Fil1 Shell of the Analog Instrument and you’re on your way to a dark, dark place.
Head here for more on TV themes.