How to setup your studio monitors and properly install acoustic treatment.
Every musician/engineer/sound designer dreams of having their own studio space. A place to hone ideas, craft recordings and experiment to their heart’s content. The vision of having all your gear set up in the one place, with everything plugged in and ready to record (while also putting your own little spin on the correct Feng Shui and vibe) is something definitely worth striving for in your studio setup.
But hold on there, Captain Turbo. While there is little doubt that project studios are an ideal refuge for creativity, there are also some important elements that need to be very closely monitored (see what I did there), in order to get the most out of your space.
Arguably the most important of all of these is the positioning, placement and acoustic relationship between you, your monitors and the room.
Funnily enough, this is also one of the most widely overlooked aspects in setting up a studio space and may seem like a bit of a drag to some (not for me personally, I happen to love this part). However with a few simple steps and simply by following some general rules of thumb, you can transform your studio into something that both feels and sounds amazing! So let’s whip out the tape measure and get cracking!
Summary:
- Choosing your studio space is an integral part of creating an ideal monitoring environment, and you should aim for a ‘fat rectangle’ shaped room.
- Your listening position should be 38% of the length of your studio space, with monitors forming an equilateral triangle that converge just behind your head.
- Acoustically treating your room can start with simply covering your flooring with carpet and rugs, before moving onto using absorption panels to treat first reflections and using bass traps in the corners.
Read up on all the latest interviews, features and columns here.
Dimensions and Symmetry
So the first thing to take into consideration is the massive sonic influence the room itself is going to have on your overall monitoring situation and recorded output. This is the same whether you are setting up in a spare bedroom at home or scouting potential spaces uptown. Either way the shape of the room, the height of the ceiling and a minimum of about ten other variables are all going to have an effect on your monitoring experience, so it’s best to avoid as many acoustic nasties as we can early on, at the selection stage, if at all possible.
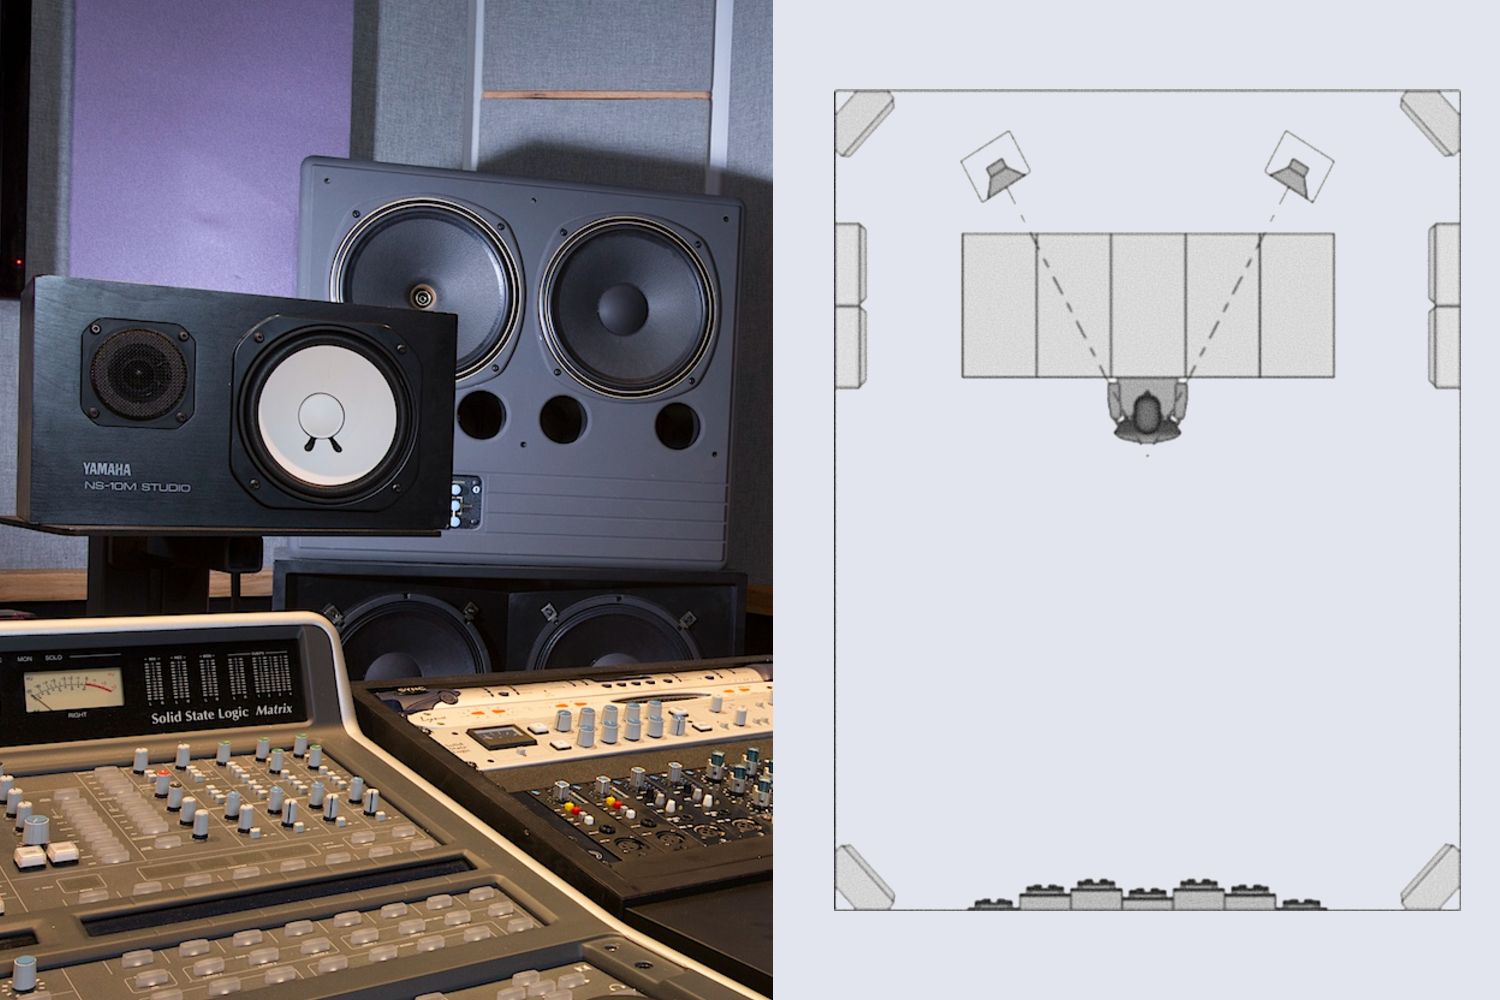
Ideally, we are looking for a room that is something of a ‘Fat Rectangle’- nicely symmetrical and wide enough that we will have the necessary space to set up our monitors (presumably nearfields such as Yamaha’s classic NS10’s) with at least a minimum amount of usable distance between the drivers, while also allowing for enough room for whatever Acoustic treatment we may need to install.
If you are intending on not only treating your room but completely soundproofing it, spare some thought for the kind of physical footprint this might incur. Your ‘cozy control room’ can so easily turn into ‘sweltering electric kennel’ once all the treatment and equipment are in there, so the best advice is to plan ahead when it comes to room dimensions and try and hold out for something with ample space, if at all possible.
Given that the monitors themselves well and truly fall under the domain of Electro-Acoustics, it’s probably also a wise idea to scope out the power situation in your prospective space at this point. Things like 3-phase, number of outlets, the need for power conditioning etc, are all better tackled at the planning end, rather than go to all this trouble with the setup and treatment only to have your monitors play possum. This also goes for studio setup sins like fluorescent lighting, noisy A/C units and other environmental considerations like ambient noise and neighbours. It’s best to think about this stuff before you sign the lease and save yourself a trip to rental advisory.
Measure your studio setup
Next it’s time to introduce our old friend, the tape measure. Taking some simple measurements of your room will help inform you of where things need to be placed. This is as simple as measuring the length, width and height of your room. Ideally, you want to have your speakers firing longways down the length of the room. This helps produce the best and most accurate bass response, so take this into consideration when measuring out and planning where things will go later on down the line.
Once you’ve taken down your room dimensions the game of symmetry can commence. Make no bones about it, symmetry is at the heart of all things monitoring related. The relationship between your studio monitors and the mixing position (aka your head) needs to be equal, with the differences in left and right coming from your stereo mix (not from irregular room reflections or other inherent biases), and this is where the age old concept of the nearfield equilateral triangle comes into play. Simply measure the distance between your monitor’s tweeters and then the distance from each tweeter to meet just behind your head. Refine this until you have an equilateral triangle.
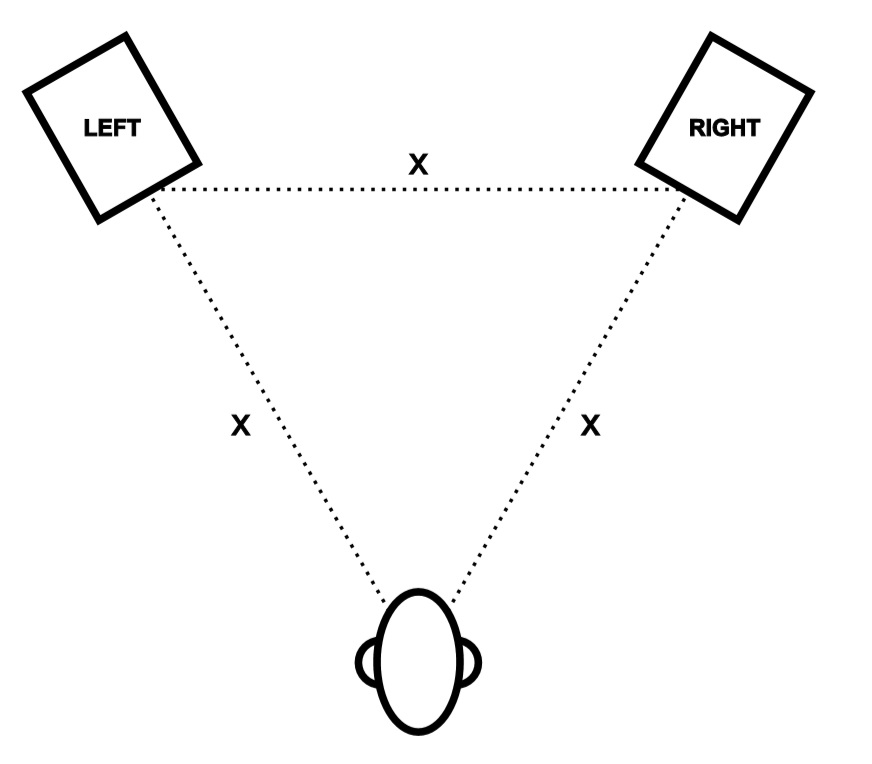
Once this has been established, you can think about this triangle as an object which can be moved around in your room. It doesn’t particularly matter how narrow or wide the distance is (the old LA studio setup rule of thumb is 67.5 inches, between the tweeters and your head.), but if you have the space to stretch out, by all means do it.
It’s also a good idea to try leaving some space between your monitors and the side walls (ideally 50-60cm from the wall to the tweeter) and avoid placing monitors in corners (another advantage of setting up in a ‘Fat Rectangle’ type room is the extra space at the flanks and corners). This will help to minimise low end build up and give a more accurate response at your listening position.
Now that you’ve established equilibrium with your monitors, we can now locate the ideal mixing position in your room. This is where the 38% rule comes into play, which is the most accurate place in a room acoustically. This is how it’s broken down. Take the length measurement of your room and calculate 38% of that number. Then measure that number from your front wall (as in the wall you’ll be look at when facing your speakers). With this in mind, then measure exactly half of the distance (50%) between your side walls, aka the width of your room. Combine this with the 38% distance from the front wall and voila, that’s your mix position! You can then combine this with the equilateral triangle of your monitors and head and if calculated correctly, you should have the following figures locked in.
- Equal distance between your monitor’s tweeters and each tweeter meeting behind your head at an equal distance – an equilateral triangle.
- 38% of the room length measured from the front wall.
- 50% of the width of your room meeting 38% room length = mix position.
This in turn should mean each of your monitors measure the same distance from their respective side walls, because of the equilateral triangle already calculated and you being positioned at 50% of the width of the room. In terms of monitor height, having the tweeters roughly at ear height is a great starting point. Just avoid having the monitors firing well over your head or down at your shins. A good trick is to take a couple of small hand mirrors and some blutack and stick them over the HF tweeters of your monitors. Then angle both inwards until you can clearly see your ear in each mirror and both are presenting a basically identical, mirror image of one another. The closer the reflections match, the better and more symmetrical your alignment.
Simple Treatment and other practicalities
Now that the room dimensions have been measured and the ideal monitor and mix positions have been established we can move onto some basic acoustic treatment. You might be asking, well sure, I’ve got a great monitor and mixing position but how do I know where to put acoustic treatment and what sort of treatment should I be using? Well that is entirely it’s own can of worms and is something probably best explored in it’s own separate article (which indeed is coming later as part of the Monitoring Month festivities), but there are some simple, practical things you can do before reaching for the Rockwool or Helmholtz resonator.
If you have set up in a warehouse, industrial space, or any kind of tiled room, your first point of call should be the discount rug shop. Exposed, hard floorings like concrete and tile are particularly prone to something called flutter-echo, which is one of the most common and easy to treat acoustic issues in the project studio. Placing some carpet underlay under the rug will further increase the absorption properties and help quell some of this without causing too many adverse acoustic side-effects.
If we have talked about the floor, then it’s only right that we mention the ceiling. Ideally our space would have reasonably tall ceilings which would be flat (like our floor) rather than arched or tiered, to allow for easiest possible treatment. If not or if it’s an industrial space with exposed insulation or even worse, a tin roof, then we may have to look at breaking out the wood and chains and flying some home made panelling from the rafters if we have the mounting points.
One of the most criminally overlooked aspects of the DIY studio is the desk itself and the heavier this is, the better quite frankly. Not only are these generally better at carrying the weight of your monitors/mixer/DAW controller/desktop computers et al., they are also less prone to reflections and are a cheap way to quell some other acoustic nasties that may enter the fold. Try and find something made from a solid piece of timber. If you can carry it by yourself, it’s probably not heavy enough.
While we are on the topic of desks, if you aren’t placing your monitors on decoupling pads or sound absorbent speaker stands, you should really be doing that. This is one of the best ways to minimise resonance between the surface and the monitor, as the pads absorb the resonance emitting from the monitors and create something of a buffer, preventing your monitors from playing your desk like a giant saxophone reed. This in turn produces a far more accurate frequency response (especially in the lower frequencies) and alleviates nasty resonances or masking of sound from your monitors.
In terms of acoustic treatment, the first point of call (after making sure your desk isn’t reflecting sound) is reducing the first reflections from your monitor speakers. These will exist at approximately 90 degrees from the front face of your monitor. Following the equilateral triangle adage from earlier in this article, reflections will hit the side and ceiling surfaces of your space at 30 degree angles from the front face of your monitors and this will be where you should focus your acoustic panels. To figure out exactly where they are, you can use the small mirrors mentioned earlier and tape them to a mic stand, place them on the sides of the room, and find the point where you can see your monitors from the listening position. That’s where the centre of your acoustic panel should sit.
To treat lower frequencies in your studio setup, you’ll want to build or purchase bass traps and focus them in the corners. Bass builds up in corners more than any other part of your room so for effective treatment, you’ll want to focus on the four corners of your rectangular room. The long, low-end frequencies will travel through your treatment twice, once the way in and and once on the way out. Building panels yourself is very doable and there’s plenty of online resources about how to do it, which materials to use and which broadband absorbers will treat the specific frequency range you’re looking for but we will cover all of this in depth with another article later this month.
Calculated studio setup results
As the old adage says, prior planning prevents poor performance and when it comes to studio location, monitor setup and basic acoustics, this is very much the case. Understanding these few basic rules of thumb can take your space to the next level, allowing you to mix with more confidence. Of course getting to know the intricacies of your unique space is what it’s all about, but knowing you’ve calculated your studio setup accordingly will yield optimum results in the long run. Merry mixing everyone!
This Monitor Month article is proudly presented by Yamaha Music Australia