The Abbey Road Reverb technique is highly coveted and it's easy to hear why, here's how to recreate it without breaking the bank
Each day, more arrive. Convolution. Modelled. Oversampled. You think of it, someone has created it… plugins!
We’re undeniably in a golden age of audio processors. A laptop computer and a few hundred dollars can buy the equivalent of a recording studio that just 30 years ago would cost millions of dollars. With all those options, however, comes a steep learning curve, paralysis by way of endless possibilities, and endless YouTube reviews.
The content creators race to keep pace with the relentless release schedule of the myriad of developers vying for our creative hearts, minds, and dollars. It’s dizzying. At some point we need to step off the carousel, pause, and reflect on everything we have at our fingertips, put the credit card away and dive deeper into the creative well, to mine techniques with the tools we have at hand.
Read all the latest features, columns and more here.
In this article, we’re going to explore techniques using stock plugins to emulate a famous mixing process, the Abbey Road Reverb technique. The effect can be heard clearly on ‘Cry Me a River’ by Shirley Bassey. Listen to the clear mid-focused reverb on the strings and voice. Incredible.
Abbey Road is a studio that needs no introduction. Forever enshrined in history by way of the Beatles eponymously-titled album Abbey Road, the studio has a storied past and has served as the creative hub for some of the most iconic recordings ever made. From the Beatles to Pink Floyd and more recent acts such as Massive Attack, The Smile and Dave Omoregie (aka Dave), Abbey Road has become a revered studio of unrivalled sonic integrity.
The studio pioneered many recording techniques and technologies, such as four-track recording – using the REDD console, ADT – automatic double tracking, and advanced equalisation – RS-56 EQ. Another technique that emerged in the late ’50s/early ’60s, after the advent of the plate reverb, came to be known as the Abbey Road reverb trick. Simple in execution, but profound in utility, the technique was derived to avoid the low frequency build up that could occur within the original mechanical plate reverb units.
This build-up could muddy a mix and make it difficult to distinguish sounds in the lower frequencies between 100Hz and 400Hz, a region in audio production that is notoriously difficult to find clarity within.
To create to the effect, first set-up a drum loop on a channel in your DAW. Nothing too fancy, just something like this.
Next, route the drum loop to an auxiliary and install a reverb plugin set to 100 per cent wet. You can copy the settings below for a starting point or use a preset to achieve a standard plate or room with a 1.2 second decay time, or thereabouts.
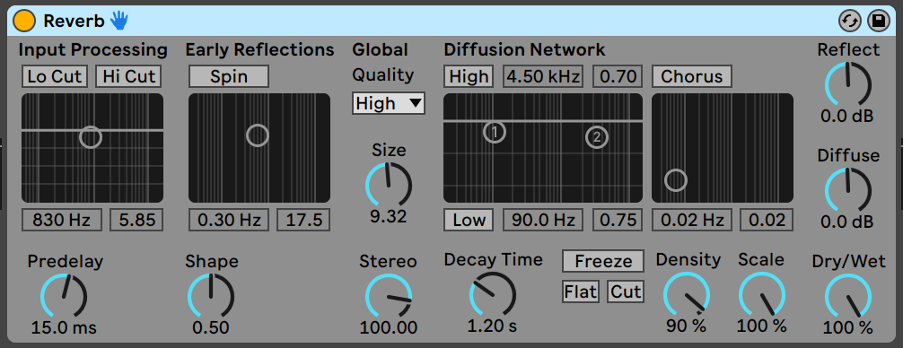
Be sure to disable any equalisation parameters within the plugins as we are going to use a separate EQ plugin to achieve this. In this example I’m using Ableton Live’s native Reverb device, but any DAW will have a suitable reverb plugin that will allow you experiment. Hit play and you should hear something like this.
It has reverb, sure, but the low frequency energy from the kick drum is making the sound muddy and indistinct, and the cymbals are adding sibilance and fizz to the high end.
To emulate the Abbey Road reverb technique we are going to apply a drastic EQ. To do so, insert an EQ plugin before the reverb plugin on the auxiliary track. Set up a high pass filter with a slope of 12dB per octave and a corner frequency to 600Hz. Alarming, I know. This will remove all of the bass and low mids from the signal to provide a clearer reverb sound that can be increased considerably in volume without obscuring the drum loop.
Conversely, setup a low pass filter with a slope of approximately 12dB and a corner frequency of 10kHz. This removes some of the cymbal spill that can make the reverb sounds fizzy. The EQ should look something like this.
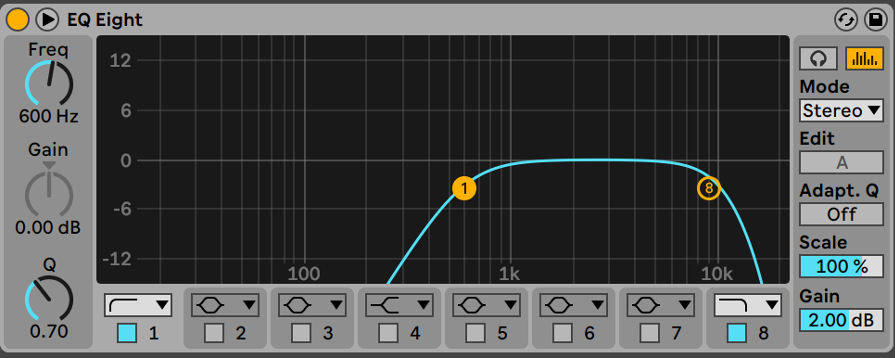
Feel free to experiment with the filter corner frequencies. The 600Hz and 10kHz can be considered starting points.
Rather than competing with the original dry drum loop, the resulting sound complements it. As a result, the reverb return can be increased in gain and sits better with the original, making the whole drum kit sit together in a single acoustic space.
Depending on the source material, this bandpass filter technique can focus the mids to a point where some additional resonance in the mid frequencies, around 1kHz – 4kHz, become noticeable. A parametric EQ can be used to reduce this resonance and further separate the audio source from the reverb.
The image below shows a gain reduction of 3dB at 4kHz.
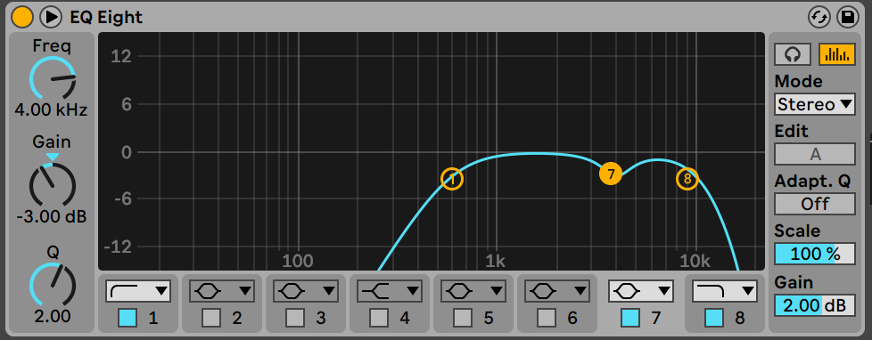
The resulting reverb level can be increased a small amount and sounds smoother and slightly less prominent in the mid frequencies. When using the technique with vocal, try reducing 1kHz with a male voice and 2kHz with a female voice, to help the reverb sit better in the mix. As always, use these frequencies as a guide only, depending on your source material.
Every analog EQ, preamp, or mixing console adds differing levels of non-linear saturation to the sounds being processed. This adds some excitement and additional harmonics to the sound being processed by the reverb. We are going to emulate the process of hitting the input section of a hardware reverb unit too hard. (A technique that has been used long used back in the pure analog days and not only with an Abbey Road plate. Think Lexicon PCM 60 reverb, LED meter redlined!).

Engineers would push the input signal into saturation and then clipping, resulting in additional harmonics being generated to the input signal. A subtle, or not so subtle distortion, depending on taste. These harmonics are heard as additional frequencies above the original sound. When fed into the reverb, there will be more frequency content between the band-passed region of 600Hz and 10 kHz.
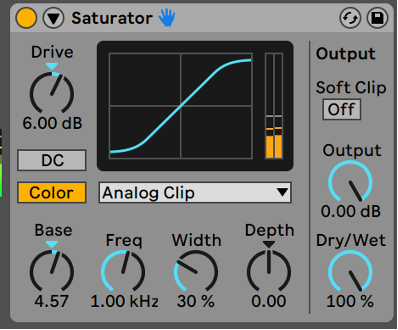
To emulate this process, insert a saturation plugin in front of the chain, before the EQ and the reverb. This will generate harmonics of the full bandwidth version of the loop. This provides a subtle perceived increased in low end response, a psycho acoustic phenomena know as the “missing fundamental” , as well as a more mid-focussed presence.
From the screenshot below, you can see the settings I used to introduce the saturation. Nothing crazy, just pushing the drum loop into non-linearity by 6.00dB. Play around with the setting as it will very much depend on how loud the drum loop is.
Now go back and listen to examples one and two to hear the difference!
With some tweaking and experimentation, the Abbey Road reverb technique can yield fantastic results and works well on a host of source material: drums, vocals, synths, guitars, acoustic instruments, horns. Try different reverb types too. Although, the original technique was used with plate reverbs it can help any reverb sit better in the mix.
Don’t forget to move the filter corner frequencies around and experiment with different types of saturation too but make a conscious effort to stick with the stock DAW plugins. The extra understanding you obtain will far exceed the marketing promises of those ever-tempting next best things!
Learn more about Abbey Road.