Looking back at the sound design and composition for first-person shooter (FPS) video games and in particular, the Doom franchise.
In this article we’ll look back at sound design and composition for first-person shooter (FPS) video games, and in particular, the Doom franchise. Read through to the end for a tutorial explaining how to create your very own “Doom Compressor” that was widely used and abused in the 2016 doom soundtrack.
Doom game
Read up on all the latest features and columns here.
Back in the early 1970’s. a group of NASA programmers were looking to find a way to test a new computer platform at the Ames Research Centre. In doing so, they inadvertently created what is widely recognised as the original first-person shooter video game, Maze War. Players could navigate a simple maze rendered in vibrant green ASCI graphics and take pot-shots at each other down the simple corridors. The ping time between firing and shots hitting their target were measured in seconds, so it was far from riveting but the ball was officially rolling. Fast forward to 1992 and iD Software released Wolfenstein 3D; a fun and addictive FPS that turned more than a few on to the joys of gaming. Not content with the stellar success of Wolfenstein, however, the team at id Software followed up quickly and in 1993 dropped the game that would change FPS forever: Doom.
The first incarnation of Doom was set on the planet Mars and its moons, Phobos and Deimos. The immersive environments, replete with an impressive array of weapons, fast paced run and gun play mechanics and dark soundtrack, proved to be a winning formula. Over time, and countless frags later, Doom became a certified classic in the genre, defining the standard against which all subsequent FPS games would be measured. Graphics considered bleeding-edge at the time, gore and gameplay aside, the immersive and dark ambience of the game emanated from the sound design and original soundtrack. Written by Bobby Prince, a sound designer and composer responsible for a host of iD Designs titles including, Wolfenstein, Duke Nukem, Shadow Warrior and Blood, the Doom soundtrack represented a departure from previous video game soundtracks. Rather than a sole reliance on orchestral or synth driven cues, like most previous games, the composer instead looked to combine these styles with metal and industrial influences, such as Slayer, Metallica and Skinny Puppy, to create something new.
Doom PS4 game
The music was brought to life using a mix of technologies. Back in the 1990’s computational power and hard disk storage was both slow and expensive, when compared to modern machines. (All hail Moore’s Law). This being the case, the original Doom installer was less than 3mb! (Way less than a single GIF today.) By contrast, the 2016 Doom follow up, on PS4, clocked in at 70gb. If maths isn’t your strong point, that represents a 23,000-fold increase in file size! Due to the tiny file size limitations, there was simply no way samples, wavetables or music tracks could be encoded into the game files. So, over time a solution, common to the broader gaming industry, was settled upon. Spearheaded by the Creative Labs company, DSP cards, installed in the actual PC running the game, were use as sample playback engines, synthesizers and DSP effects engines. The DSP engine could be leveraged by sound designers to add reverb or other effects to alter the small number of samples and MIDI based music cues, depending on the gaming environment, to create a more immersive sonic experience. Bobby Prince’s soundtrack is a little underwhelming when compared with today’s titles, but at the time it was considered a huge achievement and, more importantly, in context, it worked. It is important to remember that any guitar sounds in the soundtrack were based on a general midi wavetable sample set so yes, they do sound cheesy. Stranger still is the reality that depending on the soundcard installed in the gaming PC, the audio would vary wildly in tone and mix. Somewhat frustratingly the original composer simply had no control over the outcome!!
When id Designs released the Doom reboot in 2016, Australian composer Mick Gordon was charged with the task of delivering the soundtrack. In an incredible presentation at the 2017 Game Developer’s Conference, Gordon states the pitch from the developers was a long way from what he had imagined. Specifically, an initial directive of “no guitars!” sucked the wind out of his sails. He speaks at length of the challenges he underwent to deliver something that both he and the developers could release, with pride. After delivering many synth driven cues that were rejected, Gordon learned to grow “comfortable with failure”. A lesson for us all. To overcome the roadblocks, Mick arrived at a realisation that would become a creative mantra: “Change the process. Change the outcome.” Subsequent submissions slowly brought the developer around to Gordon’s vision and the developer relinquished the “no guitars” ultimatum. So, much like the original Bobby Price soundtrack, Doom 2016 was a mashup of styles and genres, smashed together to yield an exhilarating and terrifying sonic hellscape.
During the process, Gordon created some unique sound design systems and effects that saw multiple chains of sonic destruction, by way of an array of guitar pedals and sound manglers, open and close depending on the level of the incoming audio signal. This audio example shows the outcome when a single sine wave is feed into one the chains. Brutal! Ever searching for new sound yielded one of the more legendary sound designs. Mick used Zynaptiq’s Morph 2.0 plugin to combine a chainsaw and distorted guitar to achieve this brutal sonic onslaught.
Another processor that Gordon speaks of briefly during the talk was a device, created in Native Instruments Reaktor, he dubbed the “Doom Compressor”. The concept is simple, but devastatingly effective. The Doom Compressor renders all incoming audio out at 0dBFS. That’s right, even the faintest reverb tail all the way down to -200dB is expanded/upward compressed to 0dBFS. Anything above the threshold is also compressed down to the same level. The result is, not surprisingly, disturbing to say the least. Reverb tails no longer fade out, instead, they change in timbre and texture over time until the very last bit is heard, then abruptly, stop.
Let’s look at creating one in Ableton Live. (The technique will work in any DAW equipped with a compressor and expander, except for the Macro assignments, but more on that later.)
Start by loading up an Instrument Device in Ableton. If you’re not sure where to start hit CMD/CTRF + F and search for the “Bright Thin Sweep Pad” but any sound will work. Next add a Reverb and increase the length to around 30 seconds. Now, add the Multiband Dynamics device to our chain. Copy the settings below.
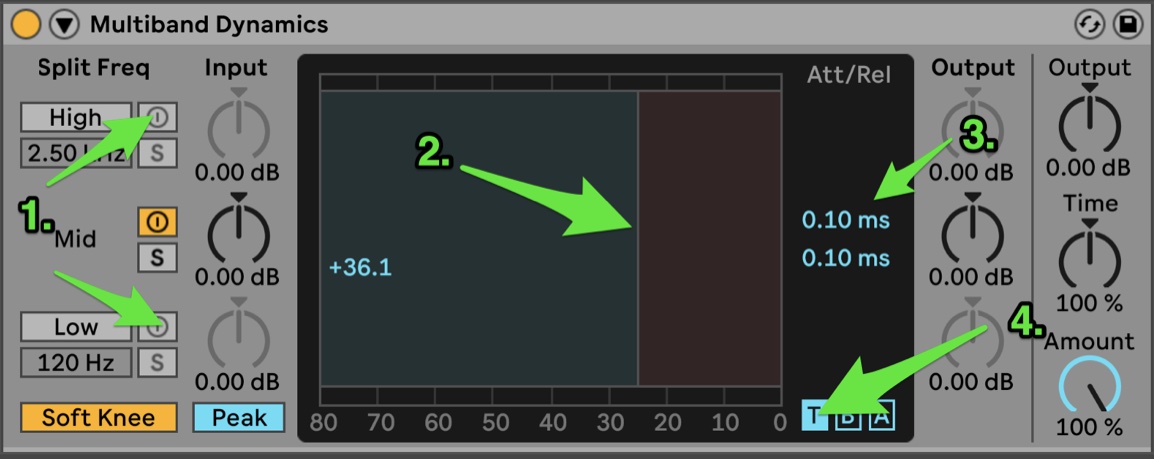
A few key concepts are as follows:
- Turn off the High and Low Frequency sections to make the Multiband Dynamics device a single band device;
- Drag the thresholds left and right to approximately -25dB. Everything below this is gained up. Everything above, gained down;
- Set the Attack and Release to fast settings for maximum sonic destruction. Making the Release value longer, will smooth out the sound, so experimentation is still available to you; and
- If you don’t see the Attack and Threshold parameters, make sure you click the T for time constant selector.
In the next step, right click on the header of the Multiband Dynamics device and select “Group” to create an audio effects rack that allows us to control multiple parameters with a single Macro Controller. After that, we’ll adjust the behaviour of the upward expansion by setting the ratio to 1:Inf. If you don’t see the ratio adjustment, click on the B to reveal the parameters that operate when the audio is below the threshold; and
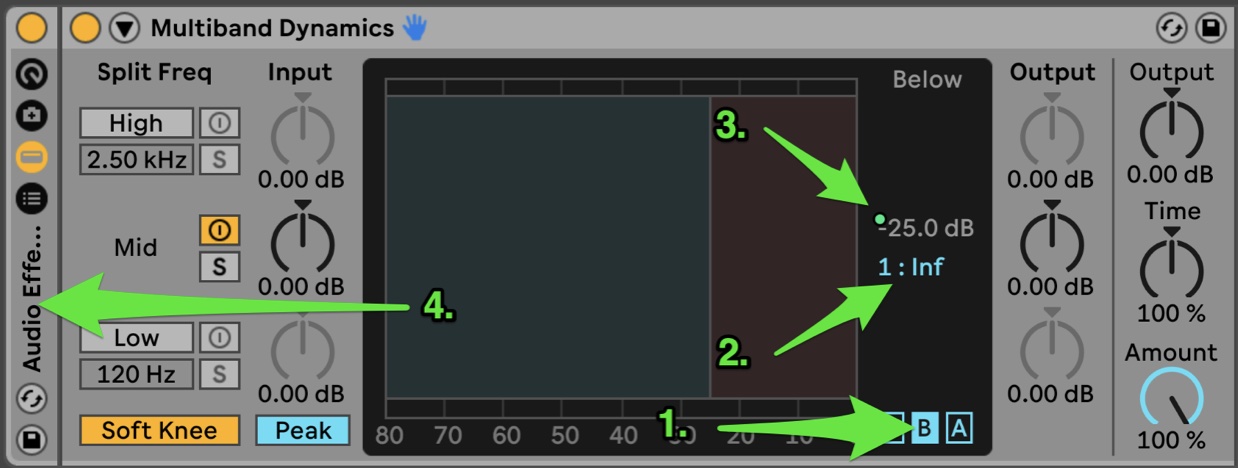
- Click B to reveal the parameters that process audio Below the threshold;
- Set the ratio to 1:Inf ratio to increase the volume/expand, the audio below the threshold;
- Set the Threshold to -25.0 dB then right click the threshold and assign it to Macro 1 of the audio rack. This will allow us to control both the Above and Below thresholds with a single Macro; and
- Double clicking the Audio Effect rack header will alternatively reveal and hide the Macro section.
With the Macro controls revealed, right click on Macro 1 and rename it to Thresh.
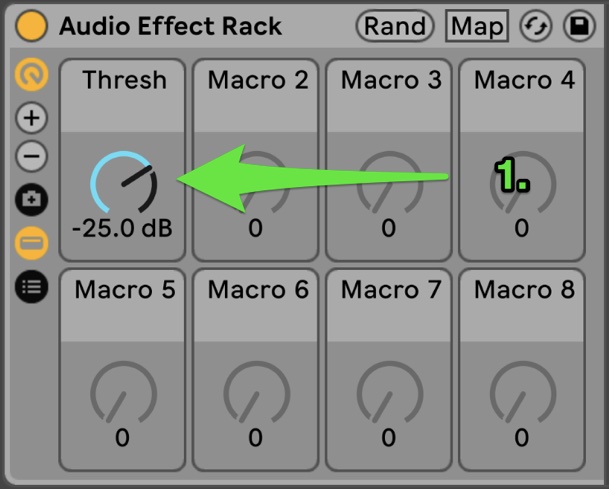
- Right click the threshold and assign it to Macro 1 of the audio rack. This will allow us to control both the Above and Below thresholds.
Now, if you play a note it should sustain for an extended duration. Subtle is not that aim of the game here, so let’s continue. First, lets protect your ears and speakers by adding a Limiter to the end of the audio rack and set the Ceiling parameter to -10dB. This will further reduce the loudest components of the sound as well as provide a safety for any loud noises that will undoubtedly occur.
Lastly, duplicate the Multiband Dynamics device by right clicking the header and selecting, Duplicate. Repeat this until you have four instances of the Multiband Dynamics device as seen in the image below. Set the Ceiling parameter to -10.0 dB and assign it to Macro 2 as before. Rename Macro 2 to read, Limiter. (I have hidden the
4 x Multiband Dynamics devices by clicking the headers. By double click the header again, now in vertical orientation, you will reveal the devices again.)
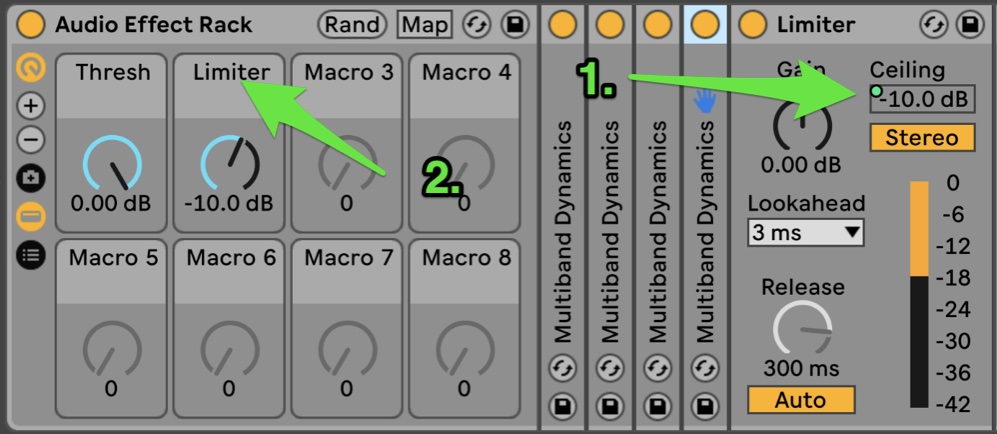
- A brickwall limiter is essential to protect ears and speakers; and
- Rename Macro 2 to read, Limiter.
Play some notes and marvel in the sound of pure doom. Try adding time based effects, such as phasers, filters and flangers after the reverb for more chaos!
Keep learning about Doom and its music here.
